An Overview of Overlays in Premiere Pro

Use Overlays to Display Clip and Sequence Metadata on the Monitors in Premiere Pro
Overlays in Premiere Pro are extremely handy for viewing sequence and clip metadata directly in the monitors. They show valuable information about the frame at the current playhead position. If you are meticulous about media management, metadata, and markers, then overlays are your reward. Let's take a look at how Overlays work in Premiere Pro, including several specific ways they can help your editing workflow.
5 Ways to Use Overlays in Premiere Pro
- Differentiate source and sequence timecode
- Differentiate sequence, project, and file names
- View sequence and clip markers names and descriptions onscreen
- Display source sound timecode
- Display camera name or source timecode for multi-camera sequences
How to Turn On Overlays
Overlays can be toggled on or off under the Program and Source monitor wrench settings.

TIP: Set keyboard shortcut for Overlays - Assign a custom keyboard shortcut to make overlays easier to toggle on and off. If you're using the Adobe Premiere Pro Default keyboard layout, I recommend Control+O for Overlays and Contol+Option+O for Overlay Settings.
Overlay Settings
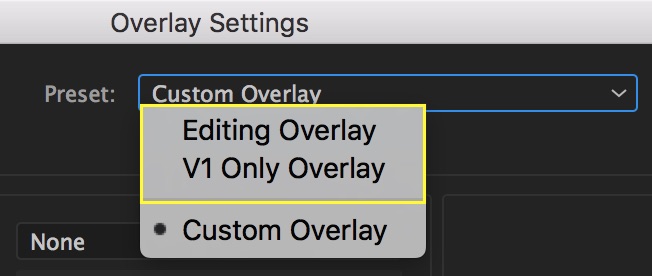
Premiere Pro gives editors the power to customize overlays, as well as choose from saved overlay presets. The Program and Source monitor overlay settings are exactly the same, so you can make them identical or different.
Tip: Use different overlays in the Program and Source monitors. For example, use clip-specific overlays in the Source monitor and sequence-specific overlays in the Program monitor. Let's take a look at how we can customize Overlay Settings.
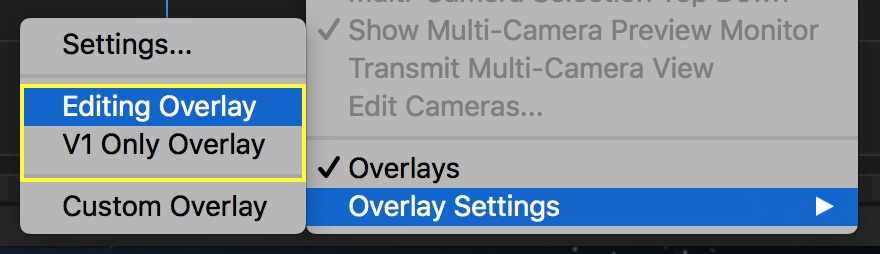
To open Overlay Settings (without a custom keyboard shortcut) click the wrench icon, and at the very bottom choose Overlay Settings > Settings.

Overlay Settings have four sections: top, bottom, left, right. Each section represents an area of the screen. For example: Source Timecode is selected in the left section and it is displayed on the left hand side of the screen.
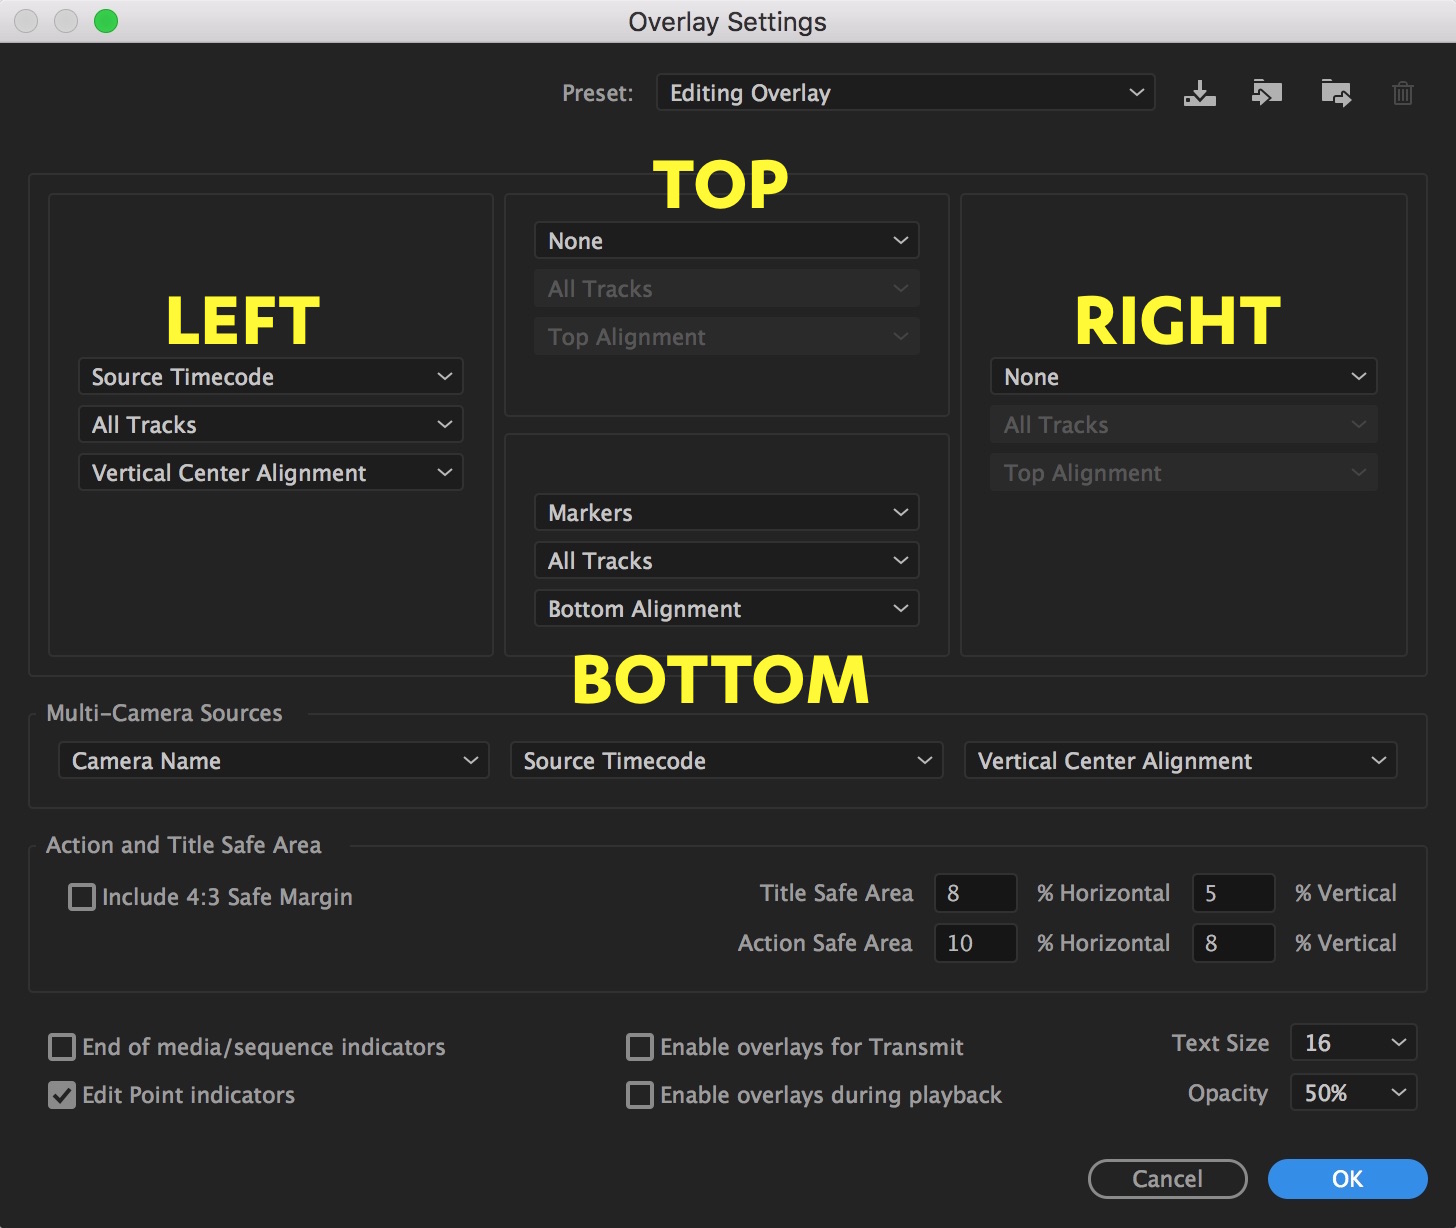
In each of the four sections there are 3 drop down menus. The top one is the actual overlay. We'll look at that in the next section. The second drop down menu selects the track. Select all or a specific track. The third drop down menu adjusts the alignment of the overlay. You can choose from one of the following: top, vertical center, or bottom alignment.

Overlays
Premiere Pro currently has 8 overlay options to choose from. Keep in mind, there are 4 areas where overlays can be displayed. Technically, you can display 4 of the 8 option at the same time.

- Source Timecode - Displays the original clip timecode at the current playhead position.
- Sequence Timecode - Displays the sequence timecode at the current playhead position.
- Markers - Displays sequence and clip markers at the current playhead position. Shows both marker name and description, and applies to markers with durations as well.
- Sequence Clip Name - Displays the sequence clip name at the current playhead position.
- Project Clip Name - Displays the project clip name at the current playhead position.
- File Name - Displays the clip file name at the current playhead position.
- Sound Timecode - Displays the timecode of the clip at the current playhead position.
- Sound Roll - Displays the sound roll name of the clip at the current playhead position.
Tracks
Premiere Pro allows you to define which track information overlays display. This could be a single video track, audio track, or all tracks. Video tracks are denoted as V1, V2, V3, and so on; audio tracks are denoted as A1, A2, A3, etc. Again, keep in mind, there are 4 overlay areas. So you can view 4 individual tracks at the same time.

Unfortunately, track selection is limited to the first 8 tracks. It would be nice to see this menu mirror the number of tracks in your sequence. Submit a feature request!
Alignment
Within each of the 4 overlay areas, you can choose the vertical alignment of the overlay. For the top and bottom areas, the overlay vertical alignment is limited to half screen. In other words, the bottom alignment for the top overlay area is the middle of the frame.

Multi-Camera Sources
Multi-camera sources have they're own overlays, and they are very simple. There are two fields for multi-camera source overlays: top (left drop down) and bottom (center drop down). They both have the same 3 options:
- None
- Camera Name
- Source Timecode

You can modify the alignment of the multi-camera source overlays in the right drop down menu as shown below.

Multi-camera source overlays only appear in the Multi-Camera view, not in the Multi-Camera Preview Monitor.

Here's the rub: the normal overlays don't work the way you would expect with multi-camera sources. For example, you would expect a Sequence Clip Name overlay would display the current camera in a multi-camera sequence. It doesn't! It only shows the name of the original track 1 camera when the multi-camera sequence was created. Not helpful!
Sequence Clip Name overlays should show the name of the selected camera in multi-camera source sequences. Please submit this as a feature request.
Action and Title Safe Areas
Safe Areas or Safe Margins are onscreen guides that show the area in which action and titles should be positioned. Otherwise, they are at risk of getting cropped by the display. Safe Areas primarily apply to content published to DVD and broadcast. With the majority of video being published to the web, they are not nearly as prevalent as they used to be.
The funny thing in Premiere Pro is Safe Areas are controlled independent of overlays, and yet they can only be customized under the Overlay Settings. To toggle Safe Areas, click the wrench settings and choose Safe Margins.

TIP - Add the Safe Margins button to the transport control bar. Click the Button Editor (plus symbol) in the bottom right of the monitor, and drag the Safe Margins button into the control bar.

Why is there is no button for Overlays?! (I always assumed it was there; I was actually stunned to discover it isn't.) This is a feature that should be added immediately. Please, submit a feature request for an Overlays button!
Customize Safe Areas
Safe Areas can be customized to fit your specific delivery to ensure action and titles are properly displayed. To adjust your safe areas, enter a custom horizontal and vertical percentage. Unfortunately, you can only modify safe margins up to 40%. Kind of a bummer as you'll see in the next section where you can snap graphics to the Safe Margin lines.

The default Action and Title Safe Areas for a 1920x1080 sequence in Premiere Pro are:
- Title Safe = 20% Horizontal and 20% Vertical
- Action Safe = 10% Horizontal and 10% Vertical
You also have the option to "Include 4:3 Safe Margin." The 4:3 safe margin cannot be customized.
2 Reasons to Use Safe Areas for the Web
- We expect critical action and titles to fall inside the safe areas. For example, we expect lower thirds to generally be positioned on top of the bottom title safe line. These boundaries are ingrained in our cinematic language.
- Even when publishing video for the web, following safe areas will prevent video player controls from interfering with your content.
Below you can see an example from a Premiere Pro tutorial by Motion Array. Notice how the lower third, at least the name, is roughly within the Safe Area. A good rule of thumb is to keep everything important - action and titles - within the action safe margin.

Make sure you subscribe to Motion Array on YouTube for regular Premiere Pro tutorials!
Use Custom Safe Margins as Graphic Guides
If you're working on a project that has a ton of graphics or titles that need to be aligned to a specific area of the screen, you can customize the action and title safe areas to snap the graphics to that point.
To enable snapping, turn on Snap Graphics under the Program monitor settings (wrench icon).

Every graphic has 6 snapping points: the center and each of the 4 corners. A red dot will appear at the point nearest the cursor when you click on the graphic in the Program monitor. For example, if you click in the top right area of the graphic, the top right corner will be activated for snapping.

Graphics can be snapped to the following guides:
- video frame
- vertical center line
- horizontal center line
- center point
- Action and Title Safe Margins (customizable)
- 4:3 Safe Margin
Other Overlay Settings
The remaining Overlay Settings are fairly self-explanatory.

- End of media/sequence indicators - Displays a purple bar on the right hand side of the screen when the playhead goes past the final frame of media in the sequence. A thin striped column appears on the left for the first frame of media, and it appears on the right for the last frame of media.
- Edit Point indicators - Displays a yellow bracket in the bottom left when the playhead is on a clip In point, and a yellow bracket in the bottom right when the playhead is at a clip Out point.
- Enable overlays for Transmit - Sends overlays to an external monitor when Enable Transmit is turned on under the Program monitor wrench settings.
- Enable overlays during playback - Overlays will remain visible during playback.
- Text Size - Adjusts the text size of overlays.
- Opacity - Adjusts the opacity of overlays.
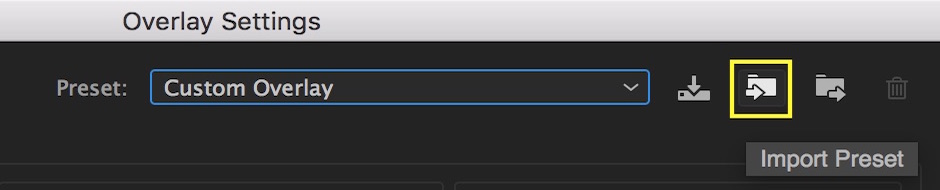
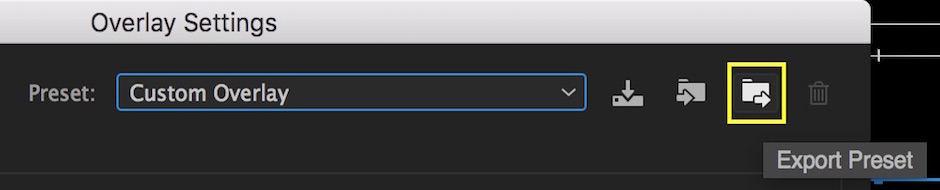
Save, Import, and Export Overlay Presets
Just like so many other settings in Premiere Pro, overlays can be saved as presets. Overlay presets can be selected from the preset dropdown menu under Overlay Settings. They are also visible in the Overlay Settings slide-out menu under the wrench settings.
To save your current overlay settings as a preset, click the Save Preset button in the top right hand side. Give you preset a descriptive name and click save.

Overlay presets are saved as a .olp file. By default, they are saved to an Overlay Presets folder that's buried under Documents, at least on a Mac. You can follow the path below to locate your overlay presets. Fortunately, a quick spotlight search for "Overlay Presets" can take you directly to the folder.
Documents > Adobe > Premiere Pro > (version number) > Profile-(name) > Settings > Overlay Presets
To share an overlay preset, simply email the .olp file to your collaborators.
You can also import and export overlay presets by clicking the Import and Export Preset buttons. As you'd expect, importing an .olp will copy it to your Overlay Presets folder. Exported presets can be save anywhere on your system.
Do you use Overlays in Premiere Pro? Or are they an entirely new concept to you? Do you see any opportunity to use Overlays in your editing workflow? We would love to hear your ideas in the comments below!