
Hands On with Premiere Handy Tools

The Handiest Tools in Premiere Pro: Meet the Developer of Premiere Handy Tools and Learn How to Start Coding Your Own Panels for Premiere Pro.
Premiere Handy Tools is simple panel that reduces multi-step workflow tasks to a click of a button. It's a free Premiere Pro extension by editor and colorist, Julien Chichignoud. In this post, we'll tell you how it works and how to install it.
The second half of the post is an interview with Julien. He shares his inspiration for Premiere Handy Tools, his future plans for it, and how you can create your own panels for Premiere Pro. We highly recommend reading the interview! There's a lot of helpful information, especially if you're interested in coding and scripting in Premiere Pro.

Premiere Handy Tools is a simple, minimalistic panel with three buttons for three simple tasks:
Sequence Duplicate +1
Sequence Snapshot
Fill Frame
[UPDATED 11/29/18]
Don't let the minimalistic design turn you off. It fits amazingly well in Premiere Pro's workspaces thanks to it's fluid resizing. It can be oriented vertically, but looks better horizontal.

Via Julien Chichignoud
Sequence Duplicate +1
This is our favorite feature of Premiere Handy Tools. Sequence Duplicate +1, also referred to as "Duplicate and Increment Sequence is perfect for creating backups of your sequences. The button duplicates the active sequence, renames it, and puts the backup in a new created "_OLD" bin.

The renamed sequence is appended with a version number (for example: _v2) and becomes the active sequence. There are no known issues with this feature.
Sequence Snapshot
Julien is 100% transparent about taking Sequence Snapshot directly from FCP X. It creates a timestamped "snapshot" of the active sequence with a user comment for easy referencing. To take a snapshot, the sequence needs to be open in the Timeline; it won't work in Project panel. Clicking the button will open the following prompt:

The user can enter his or her sequence notes which will be added under the Description metadata column. The duplicated sequence is renamed with a date and time prefix (YYYYMMDD_HHmm format) and placed in a newly creats "_SNAPSHOTS" bin.

The only known "issue" is that the Snapshot Sequence becomes active. Ideally, the original sequence would stay active and the snapshot would be left unopened.
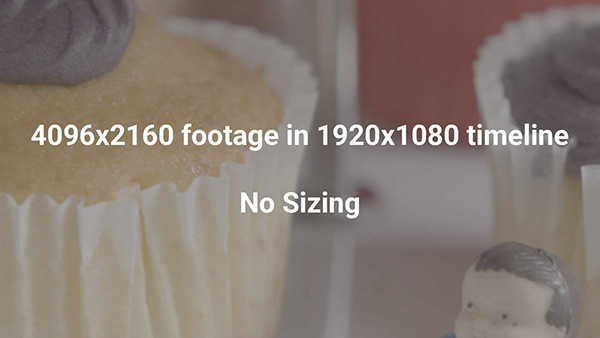
Fill Frame
You are probably familiar with Set to Frame Size and Scale to Frame Size for making your footage fit to the sequence. But when the footage and sequence have different aspect ratios, Premiere Pro will use letterboxes (black bars). Fill Frame will overwrite any scale changes by filling the entire frame with your footage. See examples below courtesy of Julien Chichignoud.


Fill Frame works with multiple selected clips. However, there are a few known issues. Most notable is the UI doesn't refresh on its own, you must scrub the timeline to force the scale to update. Also, Fill Frame won't work on footage with scale animation keyframes and it will ignore pixel aspect ratio.
[UPDATED 11/29/18] Proxies Only
A recently announced fourth button, Proxies Only, allows users to make original media offline for all clips with proxy files attached. This forces Premiere Pro to use the proxy files for export, making encode times faster. Very “handy” for quickly exporting rough cuts.

Download and Install Premiere Handy Tools
Premiere Handy Tools can be downloaded from Julien's GitHub page for free. Click the button below.
For those not familiar with GitHub, it can look overwhelming. So we've provided a screenshot below so you can see what it looks like from a safe, comfortable distance. When you're ready, head on over and click the download button as shown in the image.

Installing Premiere Handy Tools is not as tricky as it looks. It just requires a little manual installation. We promise it's not as confusing as it looks. You only have to do two things:
Enable unsigned extensions on your computer
Copy the unzipped Premiere Handy Tools folder into the Adobe extensions folder
How to enable unsigned extensions
If you're on a Mac, all you have to do is open Terminal (CMD + Spacebar and search Terminal) enter the command below and hit Run. Just remember to replace "<username>" with your computer username.
defaults write /Users/<username>/Library/Preferences/com.adobe.CSXS.8.plist PlayerDebugMode 1
Windows users can find instructions here.
Where to find Adobe extensions folder
Copy the unzipped Premiere Handy Tools folder and paste it in the following folder directories. n Mac, click the Go menu and hold Option to reveal the Library folder.
Mac: /Library/Application Support/Adobe/CEP/extensions
Windows: C:\Program Files (x86)\Common Files\Adobe\CEP\extensions
Mac users should refresh Finder, which can be done under the Apple > Force Quit menu.
Open Premiere Handy Tools
Launch Premiere Pro and under Window > Extensions you should see Premiere Handy Tools. Open it and dock the panel in your workspace.

Interview Premiere Handy Tools Developer, Julien Chichignoud
What’s your story as an editor and colorist?
JULIEN: I’ve been a freelance editor for about 13 years. I’m originally from France. I moved to Australia 8 years ago, which is also when I started to work as a colorist. More recently, I became an Adobe Master Trainer. I do a bit of work as a workflow consultant and run the occasional editing and color grading workshop.
What's your experience with coding?
JULIEN: I had been wanting to learn to code for quite a while. I tried a few online courses but never finished them because I didn’t actually have any coding projects. I didn’t have a practical goal in sight.
The very first panel I made was just a shortcut to Google Keep, which I used to display client feedback. It was literally one line of code. Because Premiere Pro extension panels are just web pages, I just needed to redirect to the Keep homepage.
What gave you the idea for Premiere Handy Tools?
JULIEN: I started Premiere Handy Tools with the Duplicate function in mind. The start was pretty daunting. It took me a few days just to wrap my head around how a panel interacts with Premiere, and how to write basic functions.
When I realized that Adobe extension panels were HTML5-based, I thought it was the perfect reason to learn HTML/CSS/Javascript. I wanted to build something that would actually help me and my editing workflow.
How long did Premiere Handy Tools take to create?
JULIEN: I haven’t kept track of how much time I’ve spent on Premiere Handy Tools. I’ve gone back and forth between several projects, courses, and coding languages since then. But I made the first version of the extension about 10 months ago, and have been slowly tweaking it ever since.
How does Premiere Handy Tools speed up your editing workflow?
JULIEN: Premiere Handy Tools is really just a collection of tiny features that I wish Premiere had. They’re there to save users a few seconds. But, when you use them 20 times a day, it quickly adds up.
And making the process easier also means it’s much more second nature. Like any editor, I’ve been guilty of not duplicating my sequences often enough and having to sift through auto-saves to find something I’ve deleted. With Premiere Handy Tools, all my sequences are properly organised. I know where the most recent version is and I know where the previous ones are. In a collaborative environment it’s also very useful because it forces all the editors to organise their project and sequences the same way, with the same naming convention.
It also avoids one tiny mistake: when you manually duplicate a sequence to work on a new version, it’s easy to forget to open that new version. I’ve forgotten to do that far too often.
The “Fill frame” option is also just a quick, easy, and relatively foolproof way to fill the frame without leaving a gap or cropping the footage any more than you need. I use it a lot as a starting point when I create a square version of an edit for social media.
Can’t you accomplish the same Functions in Premiere Handy Tools with custom keyboard shortcuts?
JULIEN: They are not functions that can be assigned to a few keyboard shortcuts, or even custom macros. They involve some logic and math. For example, to increment the version number, it needs to read the existing one, and so on.
In simple terms, how did you create Premiere Handy Tools?
JULIEN: Like any coding or editing project: baby-step by baby-step! The “Duplicate and Increment” function was the first one I wrote. It had an ugly button on an ugly background from a template extension I found online.
The duplicating part was easy. The trickiest part was figuring out the logic for the incrementation of the name, renaming the new sequence, and moving the old sequence into a subfolder. If you press undo a few times after using the function, you’ll actually see all the steps in reverse. Each step is quite basic, but combining them all is what makes the function so useful.
Once the function worked, I started the HTML/CSS part from scratch to make it look as if it was part of the actual UI. I built the panel knowing I wanted to add more buttons and functionalities. So it should still look nice as it keeps growing.
If someone wanted to create their own Premiere Pro panel, what’s the first step and what resources would you recommend?
The first step would be to learn web design. The panels themselves are just web pages that interact with Premiere via Extendscript, which is basically the same as Javascript. After Effects expressions are written in Javascript, so it’s definitely useful to learn.
Unfortunately, there isn’t much documentation on how to write Adobe panels. But, there’s a good sample panel on GitHub that shows a lot of the functions. You can pick bits of code from there to help you with your own.
There is also a very handy extension called PropertyExplorer that displays all the functions you can access in an extension. There’s another one called JSX launcher that allows you to run the Extendscript part of the code without having to code the panel first.
There’s also a new, but not quite complete, online guide to scripting in Premiere Pro.
If you get stuck, the Adobe forums are the best place to ask questions.
Will you add more functions to Premiere Handy Tools?
JULIEN: Definitely, as soon as I have an idea for another feature. I’m happy with the design of the panel. I think it integrates well in Premiere’s workspaces. Adding features is now just a matter of adding new buttons and figuring out what they can do.
The reality is that Premiere’s API is rather limited at the moment. Some of the ideas I’ve had just can’t be implemented at this point. I need to keep that in mind when coming up with new features.
What other panels have you made for Premiere Pro?
I’ve made a separate panel called Adobe Premiere Projects Navigator with a similar design that just displays the list of currently open projects and allows users to close them with one click. Ever since Premiere added multiple open projects, I’ve found it hard to keep track of open projects. Closing the Project panel doesn’t actually close the project.
I also made a panel called Premiere Browser that allows users to open any web page in a panel. I use that to open Google Docs, Trello Boards, Dropbox Papers, or anything else that might have client notes that I need to access while editing.
Do you have plans to monetize Premiere Handy Tools?
JULIEN: No, I don’t think so. At this stage, coding is more of a useful hobby. I’ve got a lot more to learn, but I think I’ve reached a stage where it’s actually benefiting me in my job as an editor and colorist. So, I feel I’ve “monetized” it by being faster and better at my job. That said, I would love to get paid to code all day!
What's your first impression of Premiere Handy Tools? Have you tried using them? We would love to hear how they've impacted your workflow. Leave a comment and be sure to show Julien some love for making his panel free!


