10 Ways Kyno Can Speed Up Your Pre-Editing Premiere Pro Workflow
Log and Ingest with Kyno Before Editing in Premiere Pro
Kyno is a standalone app that combines media management workflows into one easy-to-use interface. Think Adobe Prelude CC with more features, and it plays nice outside the Creative Cloud ecosystem. At it's core, Kyno is a logging and ingest tool built to handle pre-editorial workflow tasks, from ingesting camera media to sending to Premiere Pro. With powerful batch processing capabilities, Kyno is perfect for quickly adding metadata, renaming files, creating proxies, and much more.
Kyno Quick Facts
- $159 for 1 permanent user license
- Includes 1 year of product updates
- Integration with Premiere Pro (duh)
Why not just use Prelude or Premiere Pro?
They are similar, but Kyno dominates when it comes to batch processes such as transcoding or file renaming. Compared to Kyno, Prelude and Premiere Pro have an overwhelming number of metadata options. Kyno's leaner and meaner metadata fields encourage users to enter only the essential information, and not get lost in a never-ending metadata workflow.
With that said, here are 10 more ways Kyno can speed up your pre-editing workflow:
1. A Smart Workspace
Kyno's Workspace makes it easy to access media in your current projects, no importing or project files necessary. Click the gear icon to add a new folder of media to the Workspace. As long as the media storage is mounted, Kyno will recall all folders added to the Workspace, making it easy to return to logging your footage.
2. Create Reports
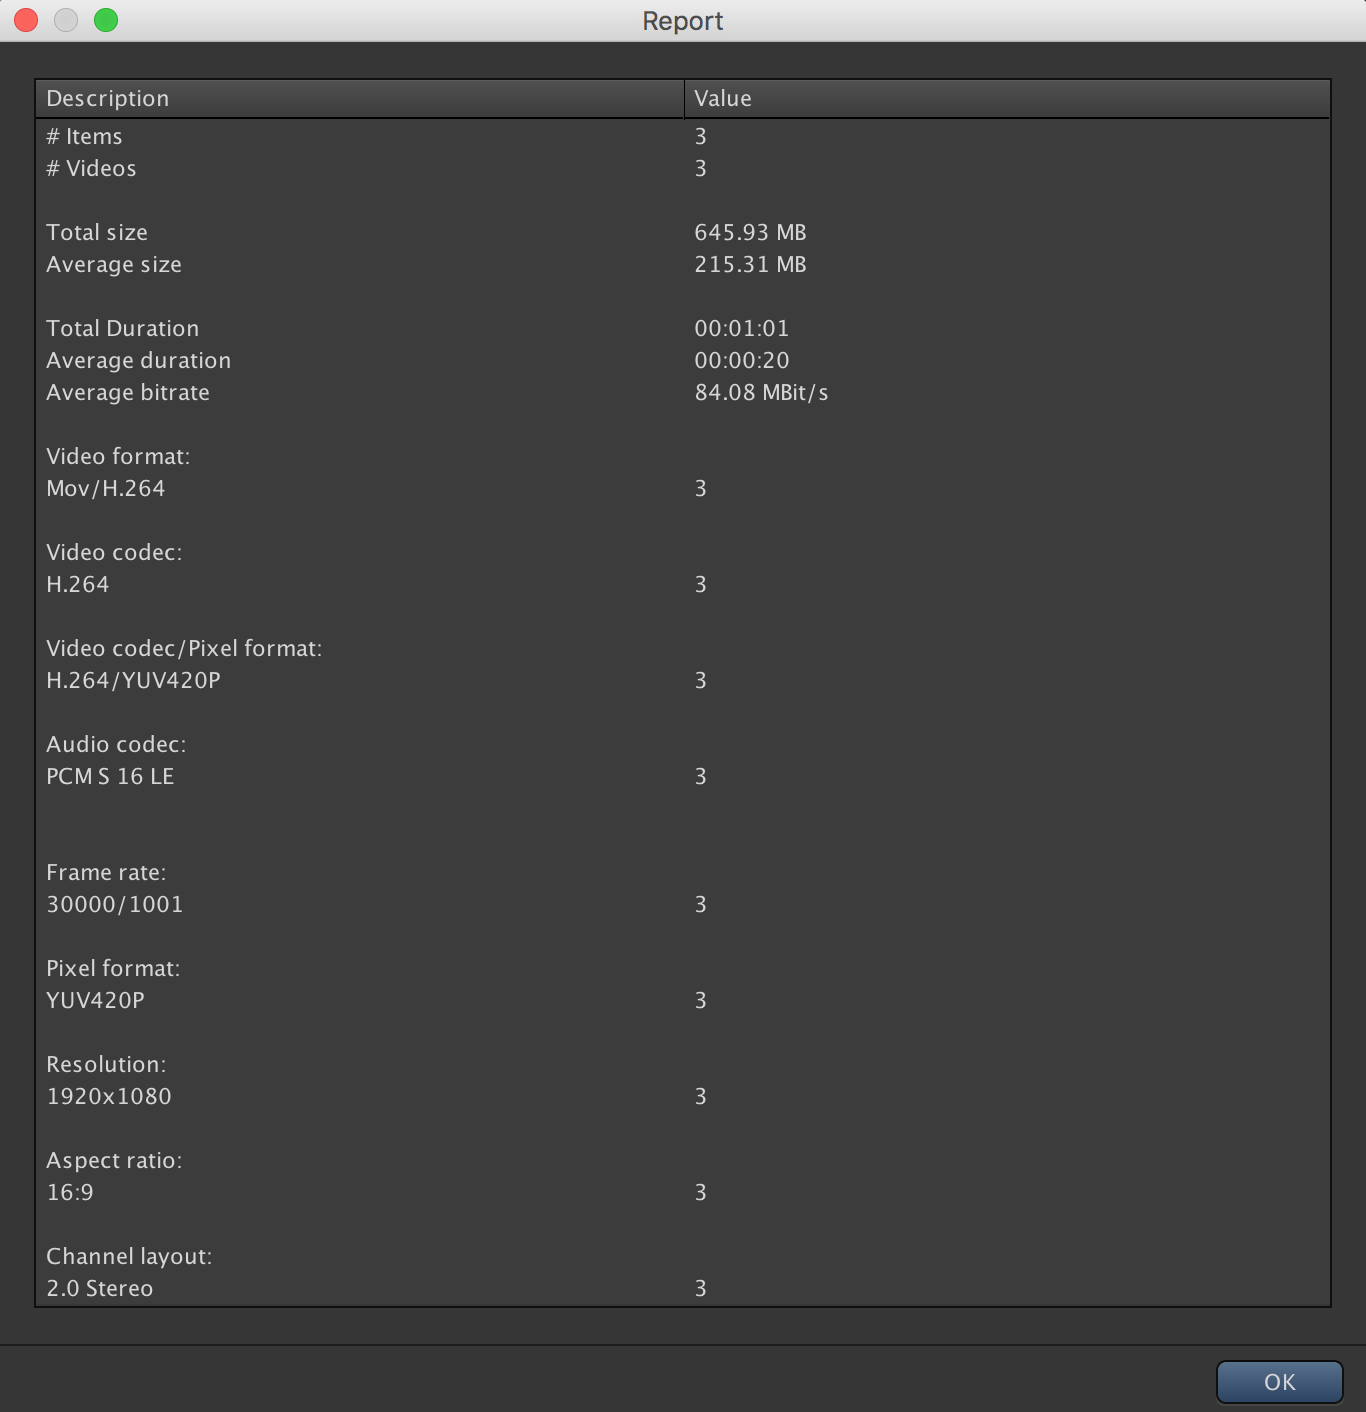
A simple but useful Kyno feature is the ability to generate detailed reports from selected clips. Let's say you're back from a shoot and you want to know how much footage you've shot. Choose the clips you want included in the report, right-click and choose "Create Report." Kyno will spit out something like this:
Kyno's reports not only give the totals for file size and duration of the selected clips, but they also give the averages. This information can be very helpful to someone like a field producer who needs to budget storage size and cost. It could also be helpful to an assistant editor who needs to make detailed ingest notes.
"Find out how to use Kyno to easily produce reports about the footage you produced for organization or billing."
3. Content View
Kyno's Content tab offers a unique way to view your clips. Open a clip in the viewer, and click the Content tab in the top, righthand side. This displays everything in your clip as a series of thumbnails. For example, the single clip below contains two interviews. You can probably already see how this may be useful for viewing footage from any shoot where they "let the camera run."
And guess what? The thumbnails are clickable! Clicking any of the content images will bring you to that specific point in the viewer. Kyno's Content tab is invaluable for finding specific moments in long shots like live events, drone shots, etc.
4. The Right Amount of Metadata
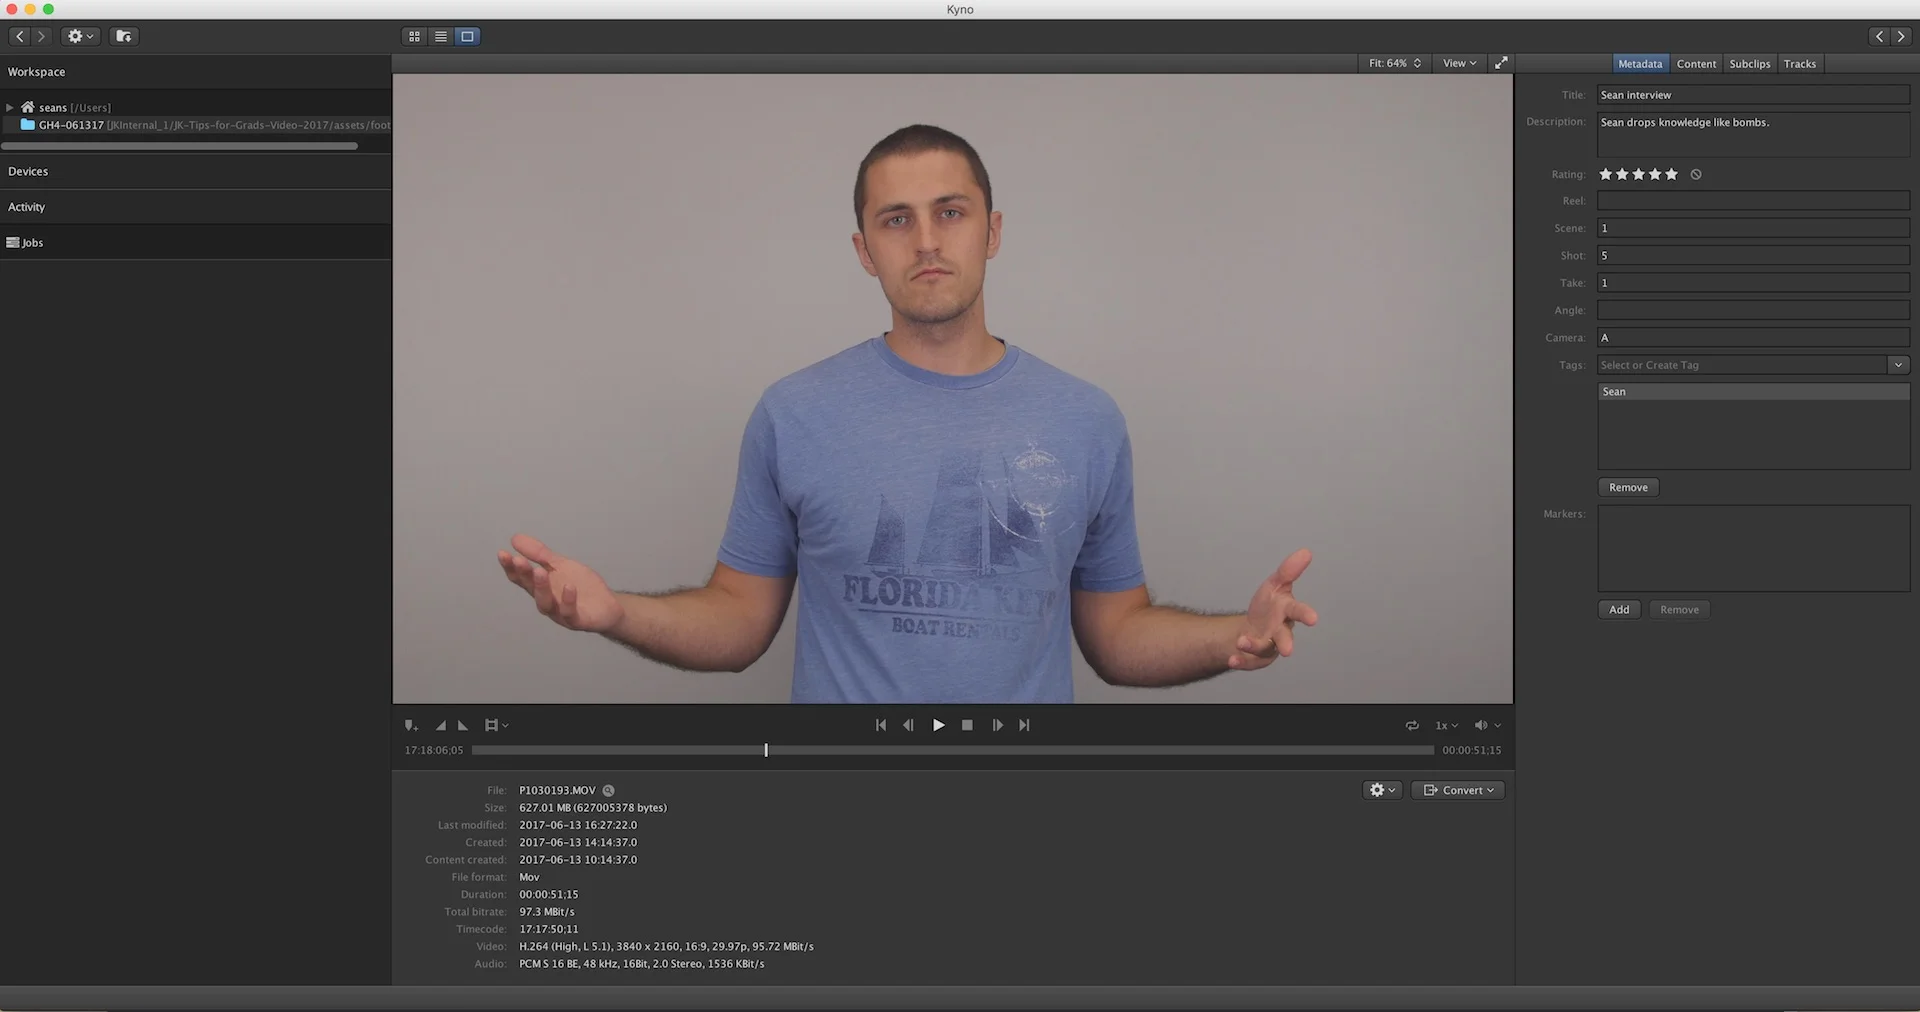
On the right side of the player there's a Metadata tab where you can add a title, description, rating, scene, shot, take, and a few more shot-specific. Premiere Pro users may appreciate Kyno's stripped-down metadata fields compared to the seemingly never-ending metadata options inside Premiere Pro. I find that Kyno's metadata categories save me time by limiting my workflow to just the essential information. In other words, Kyno doesn't give users an opportunity to chase the metadata rabbit.
Quick Note About Tags
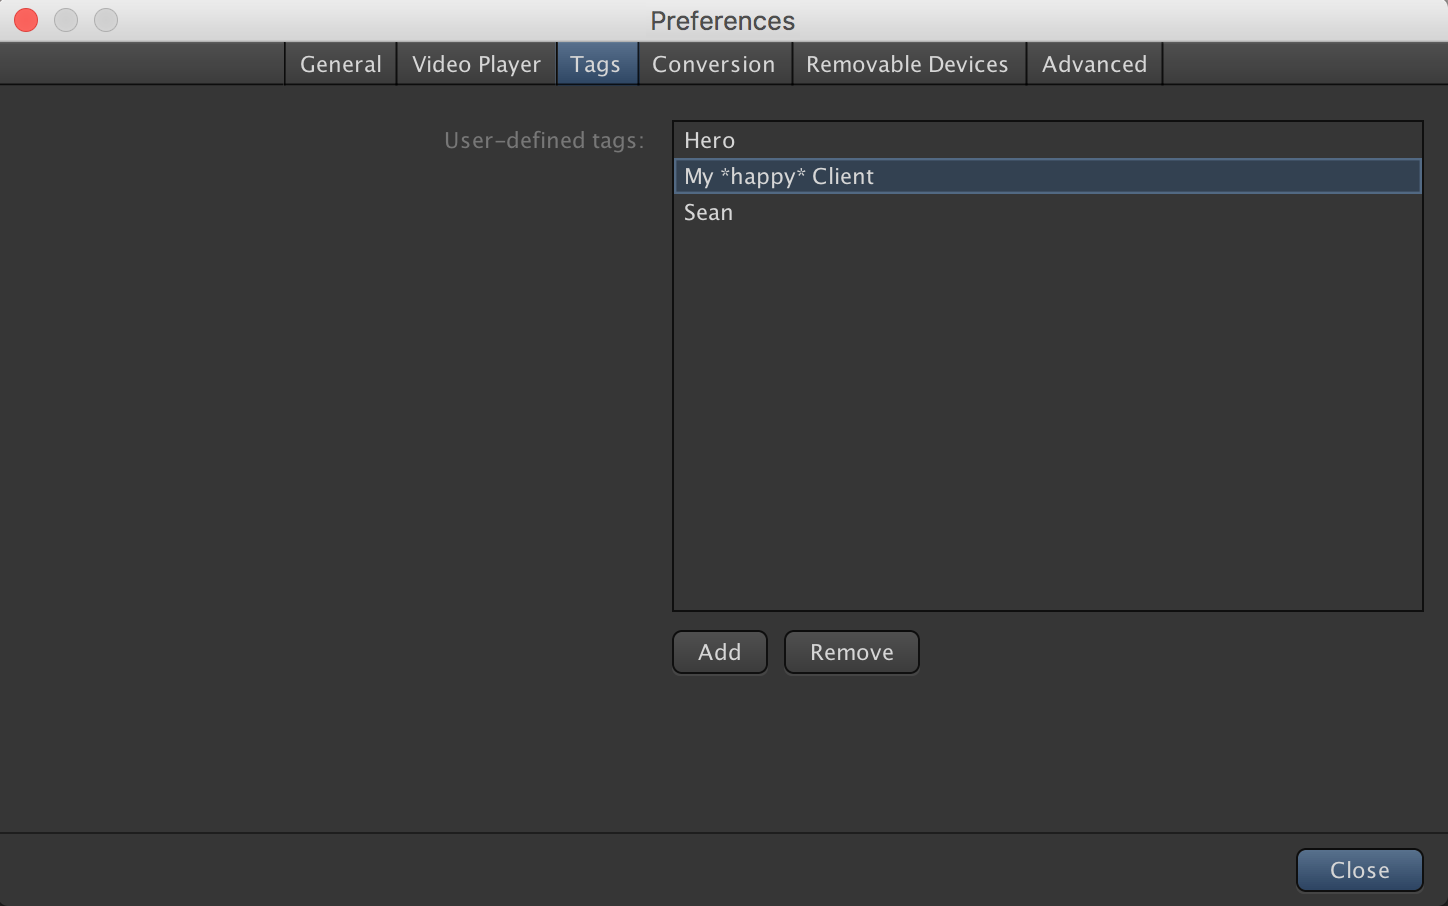
Tags are user-defined labels that can be assigned to clips inside Kyno. They behave like presets in the sense that Kyno stores all tags so they can easily be recalled in the Tags dropdown menu in the Metadata tab. I recommend using tags for high-level organization instead of project-specific metadata. For example, client names and job numbers are probably good uses for Tags. But it's entirely subjective.
You can add and remove tags in Kyno's preferences.
5. Edit Metadata for Multiple Clips
As mentioned in the intro, Kyno specializes in batch processing. Kyno also lets you edit metadata for multiple clips. This allows filmmakers and editors to log large amounts of footage very quickly. It's particularly convenient when you have to log multiple takes of the same shot, and most of the metadata remains constant.
In the thumbnail or list view, select the clips you want to edit, right-click and enter your metadata.
6. Advanced Filtering / Hide Rejects
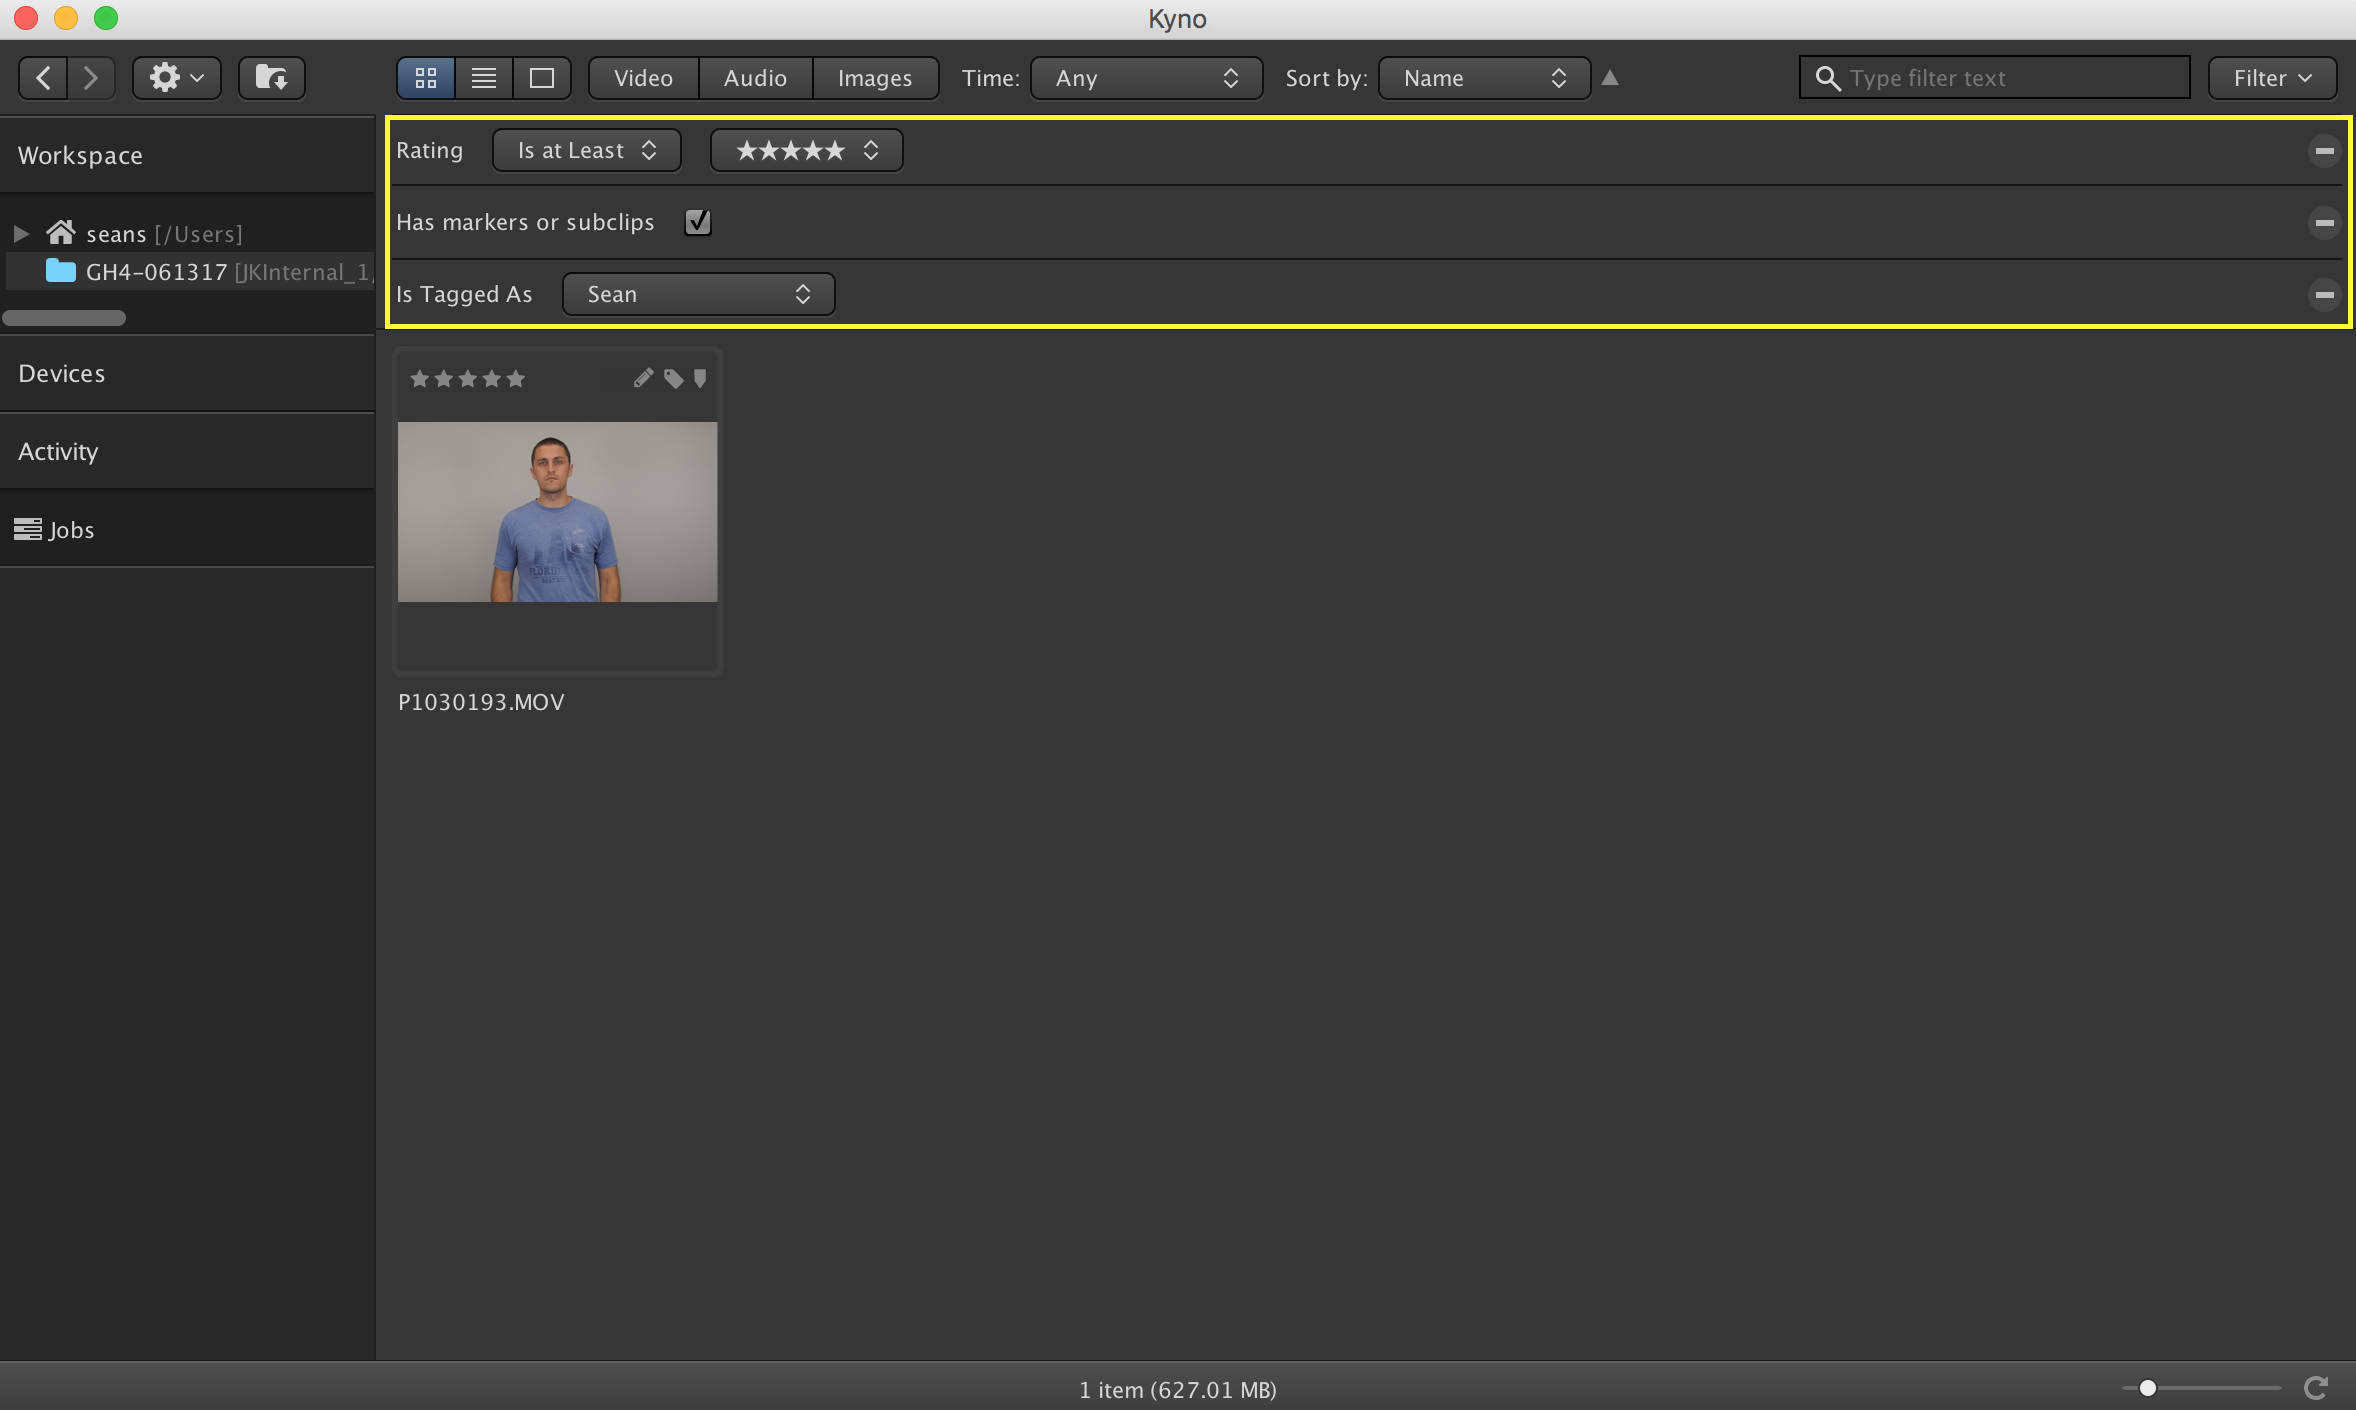
Kyno offers many types of filters for sorting your footage. This can help you locate and view particular clips quickly. You can filter clips by rating, tag, duration, just to name a few. The advanced part is filters can be combined to get very specific results; very useful when dealing with large amounts of footage.
In the example below I've filtered for clips with a 5-star rating, has markers or subclips, and has the Tag "Sean."
My favorite filter is Rating set to "Is at Least" and "Unrated". This hides any clips I've marked as Rejected. So, if I want to eliminate clips I know I won't use before adding any metadata, I can quickly rips through my clips, mark the rejects, and apply the filter to see only my useable clips.
"Find out how to quickly find what you're looking for on drives or sd cards."
7. Create Markers and Subclips with In and Out Points
Kyno streamlines markers and subclips by allowing users to create them based on in and out points. Make your selection during playback, and then choose "Create Marker from Selection..." or "Create Subclip from Selection..." from the film frame icon menu.
Markers appear at the bottom of the Metadata tab where they can be edited, exported as stills or as Excel by right-clicking on them. Learn more about markers in Kyno.
Subclips get their own tab where they appear as starting and ending frames. Same as markers, right-click them to edit, export as Excel or export them to various formats. Learn more about subclips in Kyno.
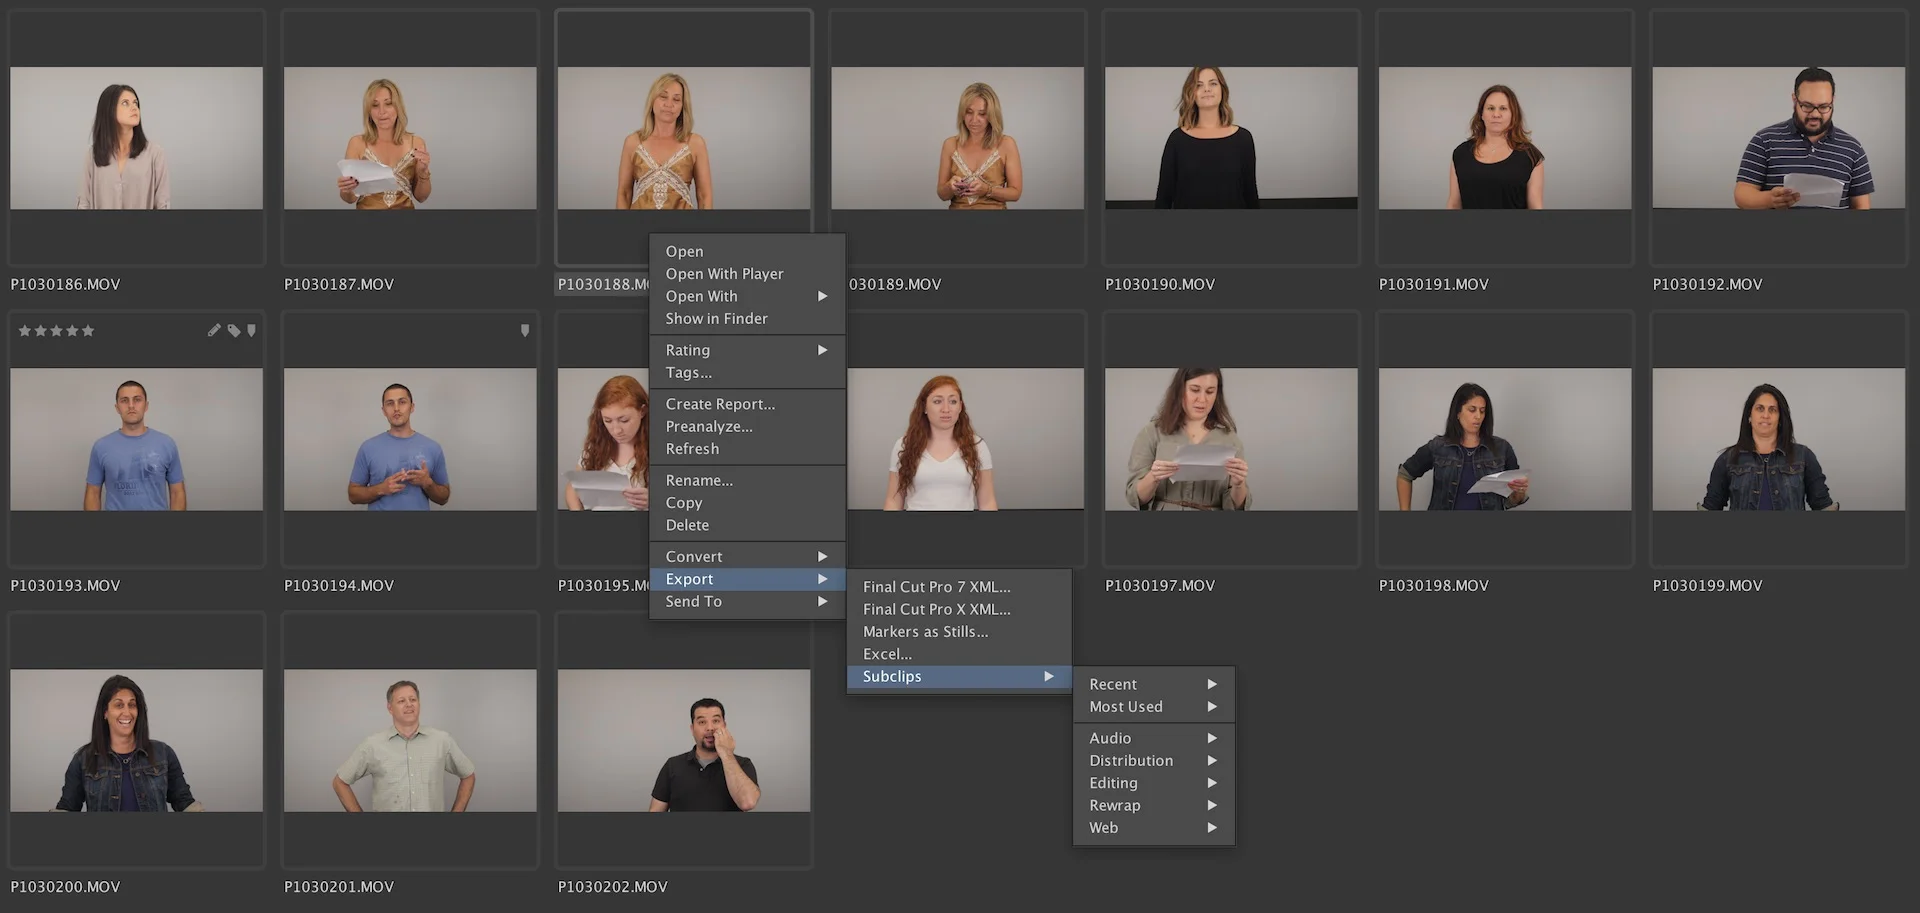
Alternatively, you can batch export subclips by selecting multiple clips in thumbnail or list view, right-clicking and choosing Export > Subclips.
Marker and Subclip Keyboard Shortcuts
- Add/Edit Marker - M
- Remove Marker - Option (Alt) + M
- Add/Edit Subclip - S
- Remove Subclip - Option (Alt) + S
The Add/Edit Subclip (S) keyboard shortcut makes subclipping your footage much fast. Press "S" a second time to edit the subclip title and description. Go to the end of the post to learn how to send subclips to Premiere Pro.
Unfortunately, there's no keyboard shortcut to create a marker from selection. Click here for more Kyno keyboard shortcuts.
8. Batch Conversion
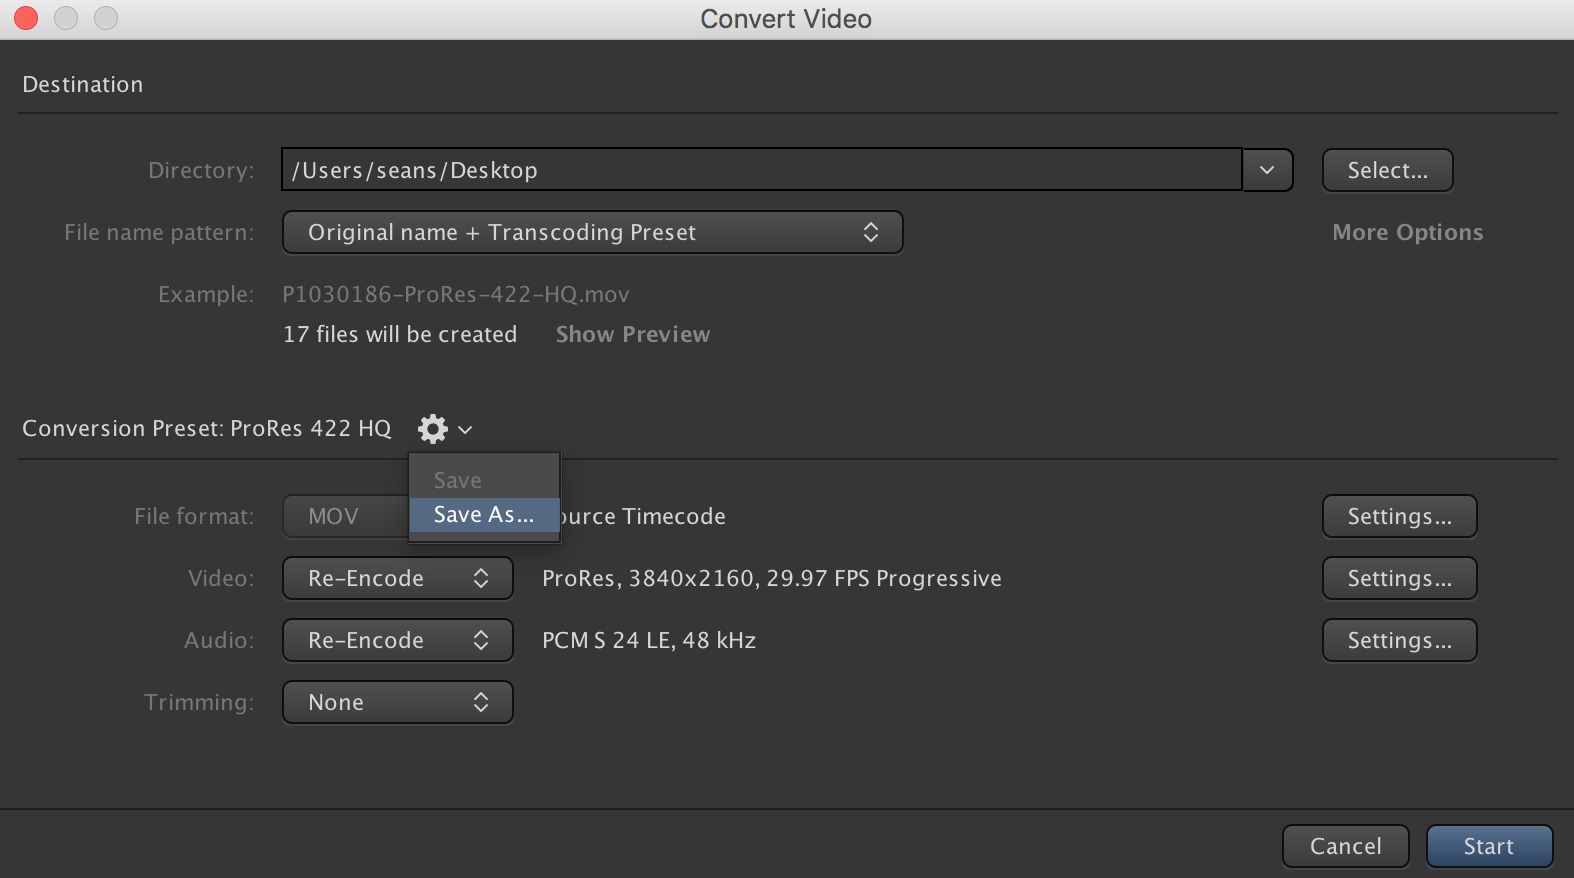
Another powerful batch process in Kyno is clip conversion. Easily create backups and proxies of your clips by selecting them in thumbnail or list view, right-clicking and choosing Convert. Kyno comes with many common export presets for editing, distribution, web, and even audio.
Kyno's Conversion settings are fully customizable. Easily change video, audio and timecode parameters, and rename multiple clips with Kyno's powerful batch renaming engine (see below for more info). In addition to keeping track of recent and most used conversion settings, Kyno also allows users to save custom conversion presets.
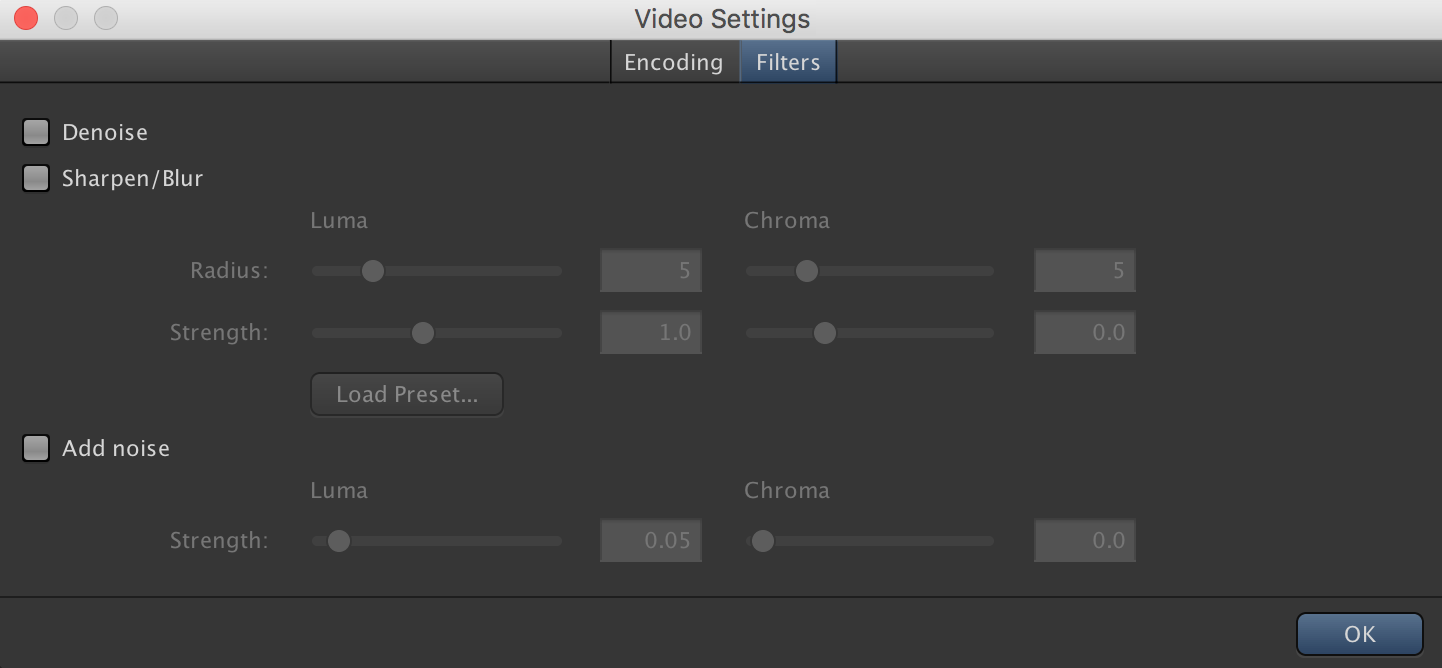
Kyno also has built-in denoise and blur/sharpen filters you can apply to your transcoded clips. These filters are especially worth expiramenting with, especially if you're transcoding 8-bit DSLR video to a mezzanine codec for editing.
9. Create Custom Batch Rename Presets
Kyno comes with plenty of intuitive batch renaming presets, more than enough to suit your basic file renaming needs. However, Kyno's customizable filename presets unlock the true power of Kyno's renaming abilities. Scroll to the bottom of the File Name Pattern menu and choose "Manage".
First, duplicate one of the presets before you start editing. From here you can add your own filename components from Kyno's extensive library of variables. Below you can see I've created my own file name pattern for subclips by stringing together the variables I want.
If you want your variables to be separated by a dash, make sure you insert the "separator" variable in between your other variables. A nice feature is Kyno shows you an example of how your clips will be renamed. Click "Show Preview" if you want to see the full list of renamed files before processing your clips.
One of my favorite custom filename presets is Original Name + Custom Name + Title. This preserves the original camera filename should I ever need to go back to the camera card or backup drive to find a specific file. For the custom name I usually enter the client/project name or job number. This custom name remains constant across all the batch renamed clips. The custom Title, however, makes each filename truly unique and searchable.
Go ahead and copy this into your custom filename preset:
${basename}${separator}${customName}${separator}${title}.${extension}
"Batch rename your files in a breeze."
10. Send Clips to Premiere Pro
All the work you do in Kyno can be sent to Premiere Pro! Well, not EVERYTHING. Not yet. Because Kyno currently relies on FCP7-XML, some of Kyno's metadata does not carry over to Premiere Pro. Below is a list of Kyno metadata followed how it translates to Premiere Pro.
Kyno Metadata -> Premiere Pro Metadata:
- Tite -> Name
- Description -> Description
- Reel -> Tape Name
- Scene -> Scene
- Take -> Shot
Select your clips, right-click and choose "Send to Premiere Pro." Then select which version of Premiere Pro you are sending to, and whether you want to include subclips. Kyno also has a handy update behavior in case it detects media previously sent to Premiere Pro.
All your media will be appear in the Project panel in a new bin. All the markers and subclip made in Kyno carry over to Premiere Pro, just as they would from Prelude. It will be exciting to see how Kyno expands it's metadata integration with Premiere Pro. Lesspain claims a full XML metadata exchange is coming to Kyno.
I hope you found this review of Kyno helpful. It's dramatically accelerated my logging workflow before bringing media into Premiere Pro. If you have any questions, please leave them in the comments below.


