Premiere Pro Audio Workflow Guide for Editors: Part 2
Part 2: Tube-Modeled Compressor, Parametric EQ, Audio Keyframes, Hard Limiter
This Premiere Pro Audio Workflow Guide for Editors is a 2-part series. Read Part 1.
We began this audio workflow series with the question, can you really produce a professional audio mix without leaving Premiere Pro? If yes, what audio tools would you use?
Of course, the answer to these questions is yes. Whether it's for broadcast or the web, the audio tools in Premiere Pro are more than sufficient to produce high-quality sound for professional videos. To reinforce this, editor and trainer, Paul Murphy, continues to share some sound tips (pun intended) based on his personal audio workflow in Premiere Pro. Paul has a deep understanding of working with audio; check out his recently published Audition CC 2017 Essential Training course on Lynda.com.
The inspiration for this blog post came from Paul's contribution to the Essential Sound panel discussion on PProChat, the Premiere Pro user chat. If you're a Premiere Pro user, join PProChat!
Tube-modeled Compressor
In Part 1 we looked at adjusting loudness with the Essential Sound panel's Auto-Match button and then Audio Gain. These are both normalization processes. This means the average or peak amplitude is set to a target loudness (or "norm") without changing the relative dynamics. Simply put, the distance between peaks and valleys in the audio waveform stay the same. Sometimes an audio track's dynamic range can be so extreme that the loudest parts sound good after normalization, but the softest parts are inaudible. This is why an audio compressor is needed to reduce the range between the loudest and softest parts of the audio.
Below you can see how the normalized audio is louder than the original, and the relative dynamics (distance between peaks and valleys) is the same. On the other hand, notice how the dynamic range is heavily reduced in the compressed audio. (This is actually a terrible example because the compression is so intense it's acting more like a limiter, which we will learn about later.)
NOTE: Compression is overdone for visual comparison.
"I add compression to the track to even out the levels. Tube-modeled is my preferred compressor. Use the gain on your compressor to accurately hit your target loudness for dialogue.”
The Tube-modeled Compressor can be added directly to clips in the Timeline, or as a track effect in the Audio Track Mixer. Like Paul, you'll most likely want to add the Tube-modeled Compressor as a track effect, so all the audio clips in the track get the same amount of compression. If you don't see the Audio Track Mixer, you can open it under the Window menu.
To add the Tube-modeled Compressor to a track, click the Show/Hide Effects and Sends disclosure triangle in the top left of the Audio Track Mixer panel. This reveals 5 audio effect slots. Click one of the Effect Selection disclosure triangles, and in the dropdown menu navigate to Amplitude and Compression > Tube-modeled Compressor.
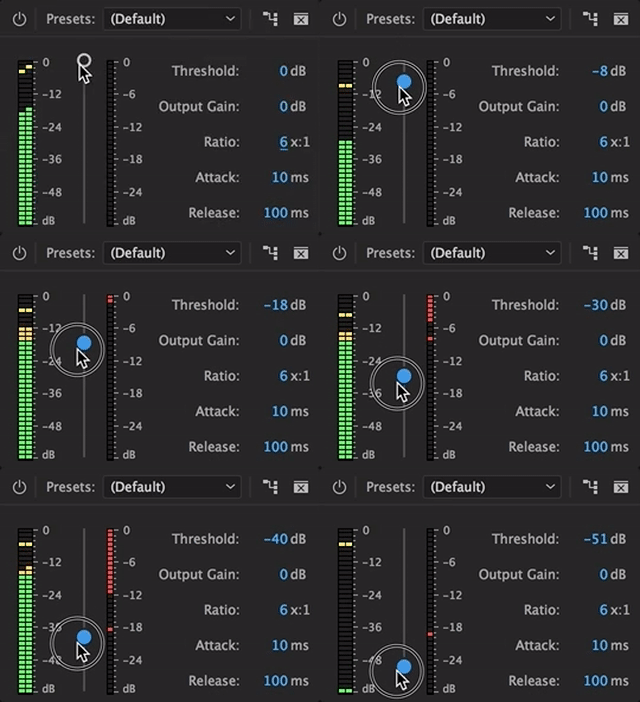
Set the Threshold to the level where you want the compressor to kick in. If audio levels exceed the Threshold, the compressor will attenuate the signal based on the strength of the Ratio. The higher the Ratio, the stronger the compression. Use Gain to fine-tune the average amplitude after compression. This is what Paul was referring to when he said use the gain to hit your target loudness. (Hint: Use the Loudness Radar we learned about in Part 1.) Set the Attack and Release to adjust how quickly the compressor engages and disengages when the audio rises above and falls below the Threshold.
Don’t get too discouraged if compression sounds overwhelming. Play around with the settings, and listen to what they do. It takes a lot of practice to achieve good, natural sounding audio compression. Click here to learn more about the Tube-modeled Compressor effect.
Parametric EQ
Compression will get your levels where they need to be, but your audio may still not “feel” right. That means it’s time for some equalization, or EQ. In Premiere Pro, many audio professionals recommend the Parametric EQ effect. So says Paul, “Add Parametric EQ to the track and boost the good frequencies, cut the bad.” A really helpful feature in Premiere Pro CC 2017 is the spectral frequency display in the Parametric EQ effect. You can actually see the audio frequencies, and get real-time visual feedback as you make EQ adjustments.
How do you know which frequencies to boost or cut? Understanding the subtleties and nuances of EQ can take years of experience. Here’s a simple Parametric EQ trick: sweep the frequencies. Increase the Q and boost the Gain so you get a very sharp curve in the center line. Using the mouse, click and drag the Frequency right and left to sweep the frequencies. Use your ears to listen for frequencies that sound tinny, rumbly, muddy, or crunchy. Cut those frequencies by dropping the gain and lowering the Q to give your adjustment a softer roll. Conversely, boost the frequencies that sound good to your ear. Again, you will probably want to lower the gain and Q to make your adjustment less sharp. Listen to your ears!
Another simple EQ trick that will improve your audio mix is to “notch” the frequencies in the music track where dialogue frequencies lives. Editor, Vashi Nedomansky recommends cutting frequencies around 1250hz, which, he says, is the heart of the human voice range. He shares more tips and his free "Music Hole for Dialog" audio effect preset here. This technique helps your dialogue “sit” in the mix better by reducing competing frequencies in your music.
Audio Clip/Track Keyframes
Some editors have a tendency to keyframe audio clips or tracks at the beginning of their audio workflow. Paul recommends the opposite, “Keyframes are the very end of the process for me, and I only use them when I absolutely have to - i.e. when I can't fix it with compression, which is a much quicker way to even out your levels.”
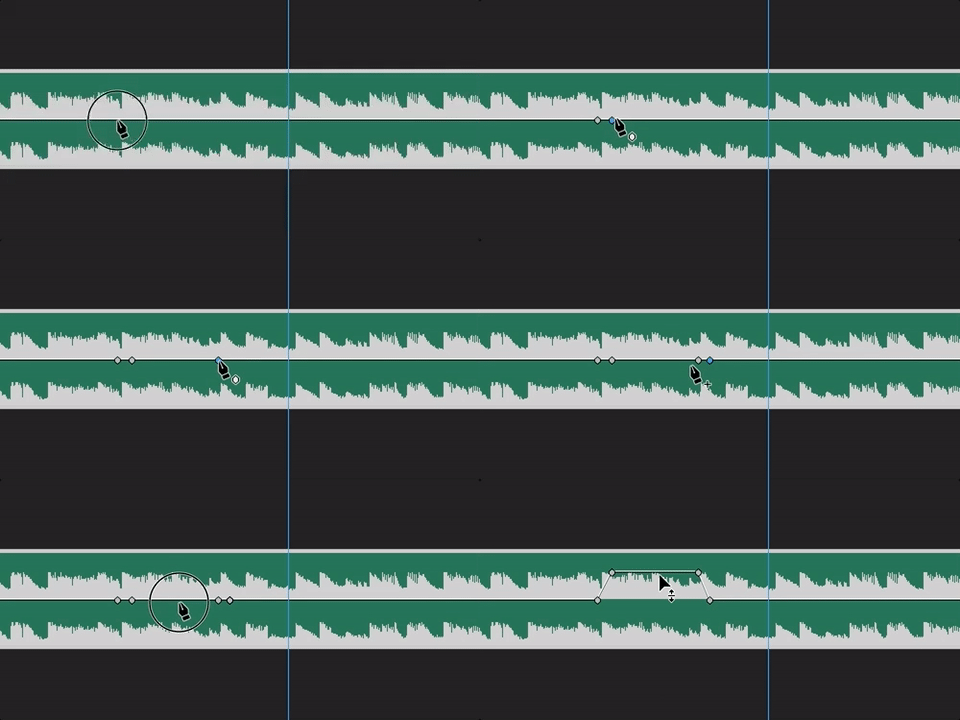
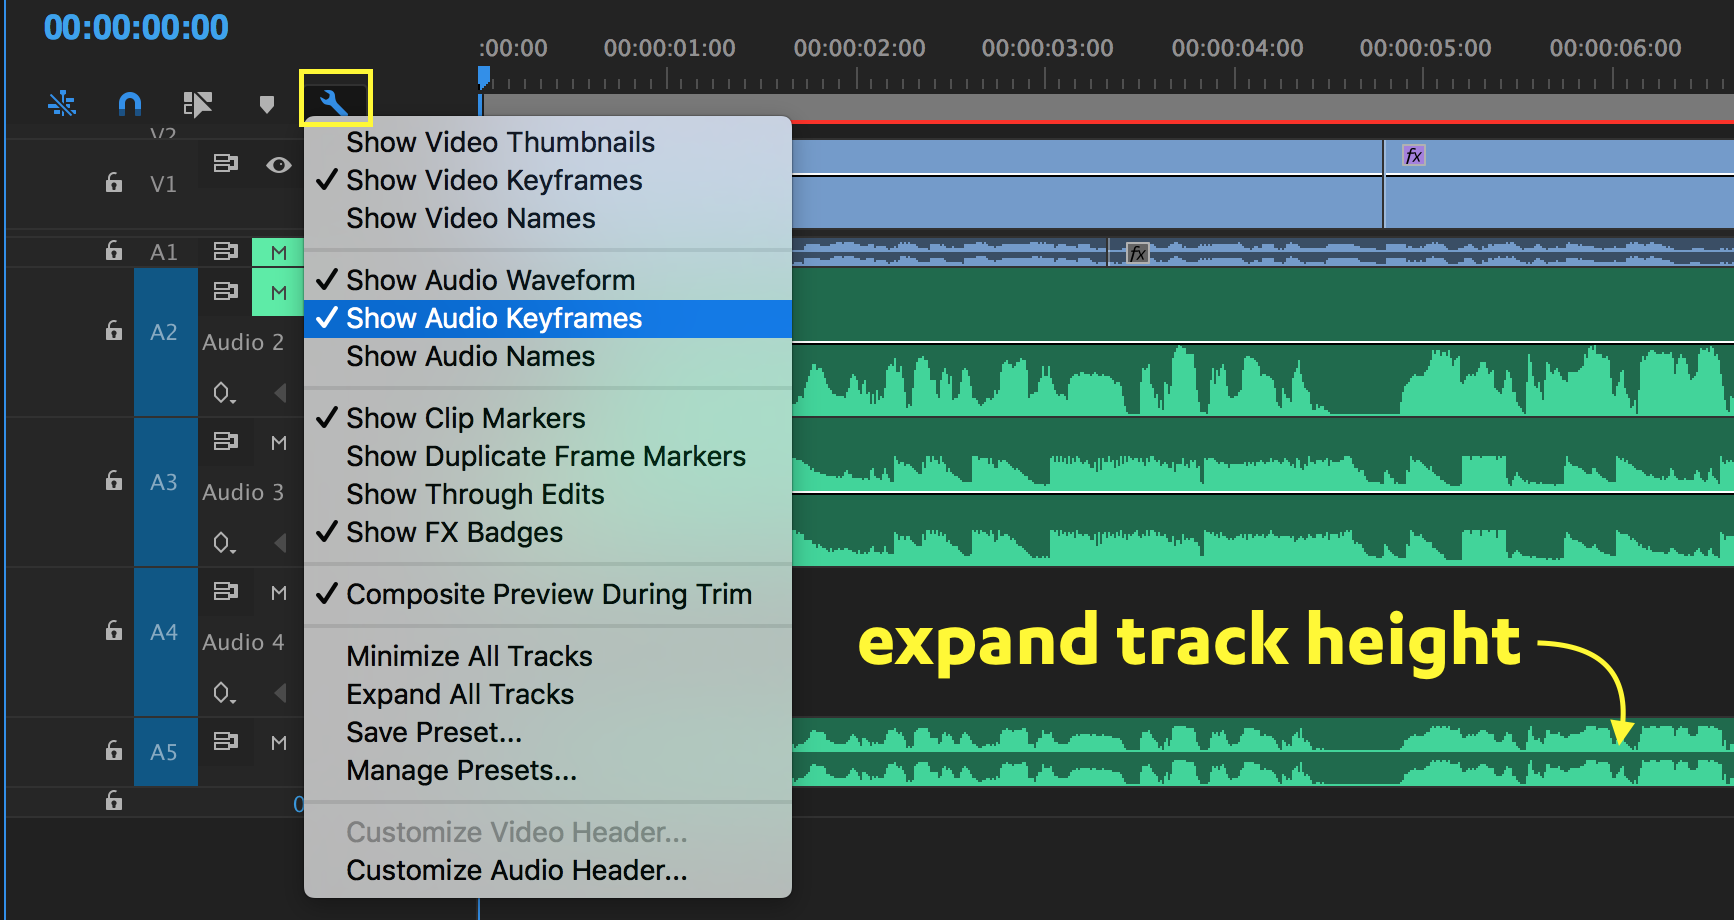
If the Loudness Radar shows something is too loud or not loud enough, then you can manually make keyframe adjustments to those specific areas. It’s simple to do. Expand the track view by double-clicking the track header or by hovering over the track with your cursor and rolling the scroll wheel. Expanding the track reveals the volume level “rubber band” - the white line that runs through the center of the audio clip. Use the Pen tool to set keyframes around the area you want to adjust. Click and drag up and down to increase or decrease the volume.
If you don't see clip or track keyframe rubber bands, make sure Show Audio Keyframes is checked in the Timeline Settings (wrench icon).
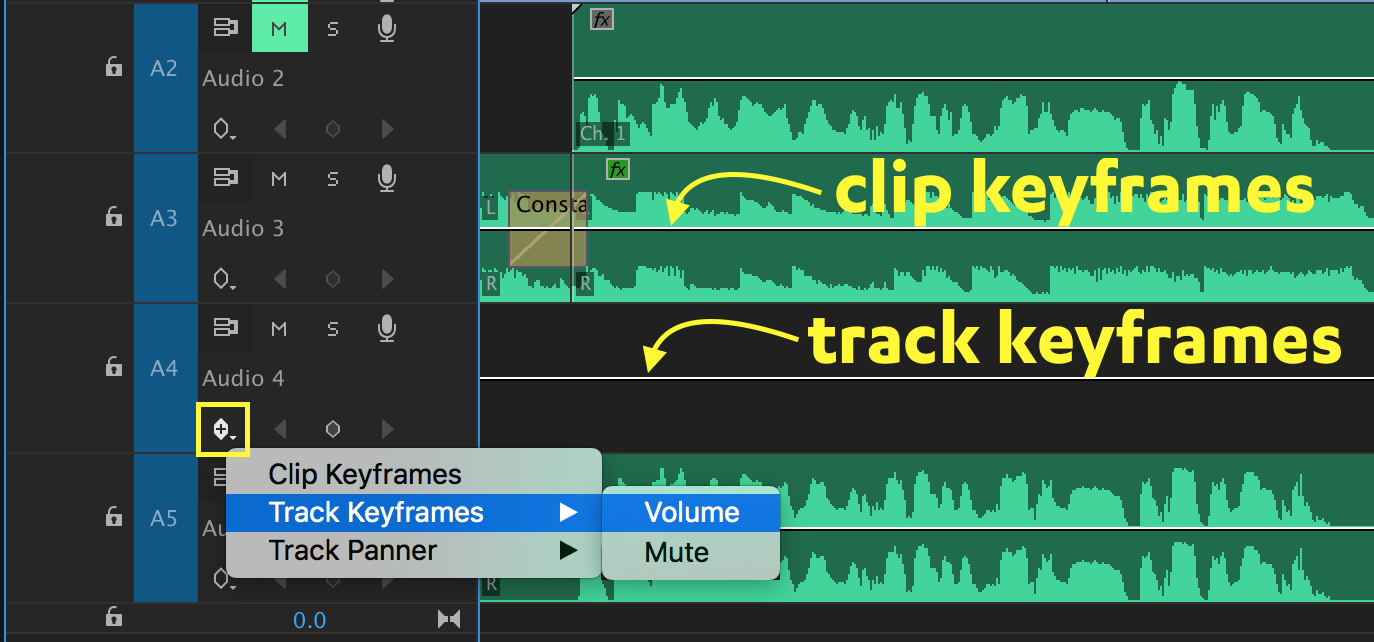
It's important to distinguish clip and track keyframes in the Timeline. The clip keyframe rubber band stretches from a clip's in to out point, and keyframes are locked to their position on the clip. The track keyframe rubber band extends the length of the audio track, and keyframes are locked to the track, regardless of where audio clips are placed. Clip and track keyframes are not visible simultaneously, and clip keyframes are visible by default. To switch to track keyframes, click the Show Keyframes button in the audio track header and choose Track Keyframes.
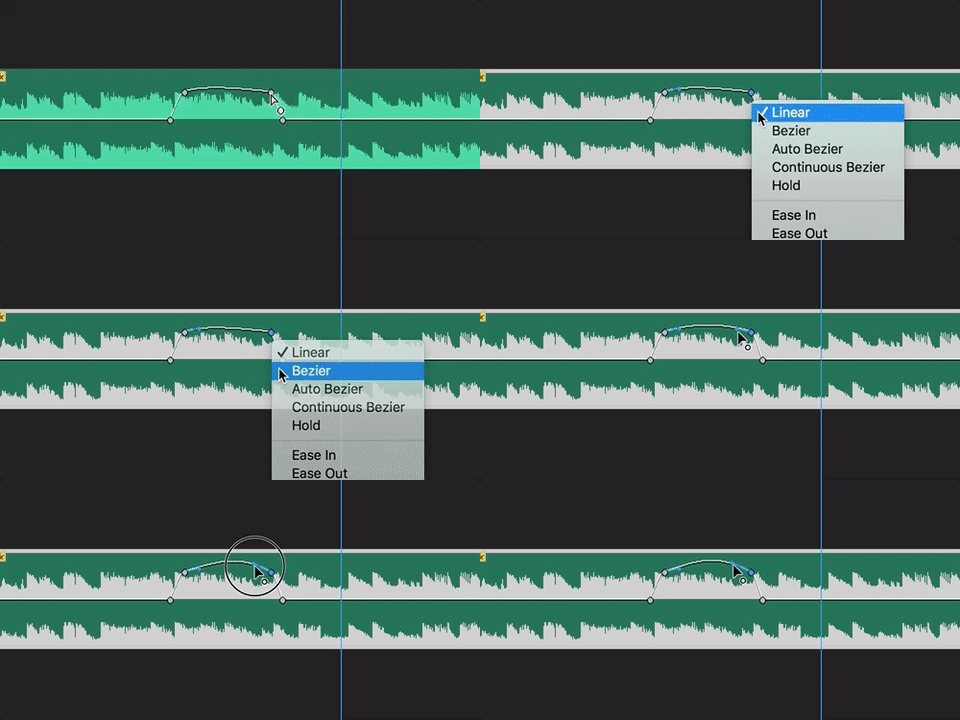
Just like animation keyframes, you can add ease to audio keyframes by right-clicking them and choosing one of the interpolation methods.
Lastly, a unique thing with clip keyframes is they can also be edited in the Effect Controls panel. The keyframes in the image below are the same as in the GIF above. Click here to learn more about how to adjust track volume with keyframes in Premiere Pro.
Hard Limiter
Once you’ve finished your mix, and checked it against the Loudness Radar, you can add one last level of protection with the Hard Limiter effect. A limiter is basically a compressor on steroids. The idea is to prevent audio peaks from exceeding a specified level.
Below you can see I've applied the Hard Limiter effect to my master track (read: entire mix) in the Audio Track Mixer. I've set the Maximum Amplitude to a high -3 dB because I am publishing to the web. You could apply some Input Boost to hit your target loudness, but I would recommend tweaking your track levels instead of adding gain to your whole mix. I drop the Look-Ahead Time and Release Time to the absolute minimum to give the Hard Limiter a "brick wall" characteristic.
Paul cautions editors to use a Hard Limiter only as a backup. “Once the full mix is done, add a Hard Limiter for safety to the Master track. This is only a failsafe, not an excuse for laziness.”
This failsafe is more recommended for editors delivery for broadcast; YouTube isn’t going to reject your video because the audio peaks exceed the legal limit. However, if you’re going to put time and effort into mixing your audio, you might as well guarantee there’s no rogue audio spikes in your mix. Again, the Hard Limiter shouldn’t have to do anything.
Thus concludes this 2-part Premiere Pro Audio Workflow series. Hope it has been as valuable to you as it has been for me. Special thanks to Paul Murphy for sharing some of his audio tips for Premiere Pro. Remember to check out Paul's Audition CC 2017 Essential Training course on lynda.com. If you have any questions or audio workflow suggestions, please leave them in the comments section below.

