
How to Create, Modify, Share, and Organize Effect Presets in Premiere Pro
PLUS: Free and Paid Premiere Pro Effect Presets
"I like having to recreate the same effect on multiple clips in multiple projects."
Said no editor ever.
That's why Premiere Pro has effect presets so editors can save and re-use customized effects.
What are Effect Presets?
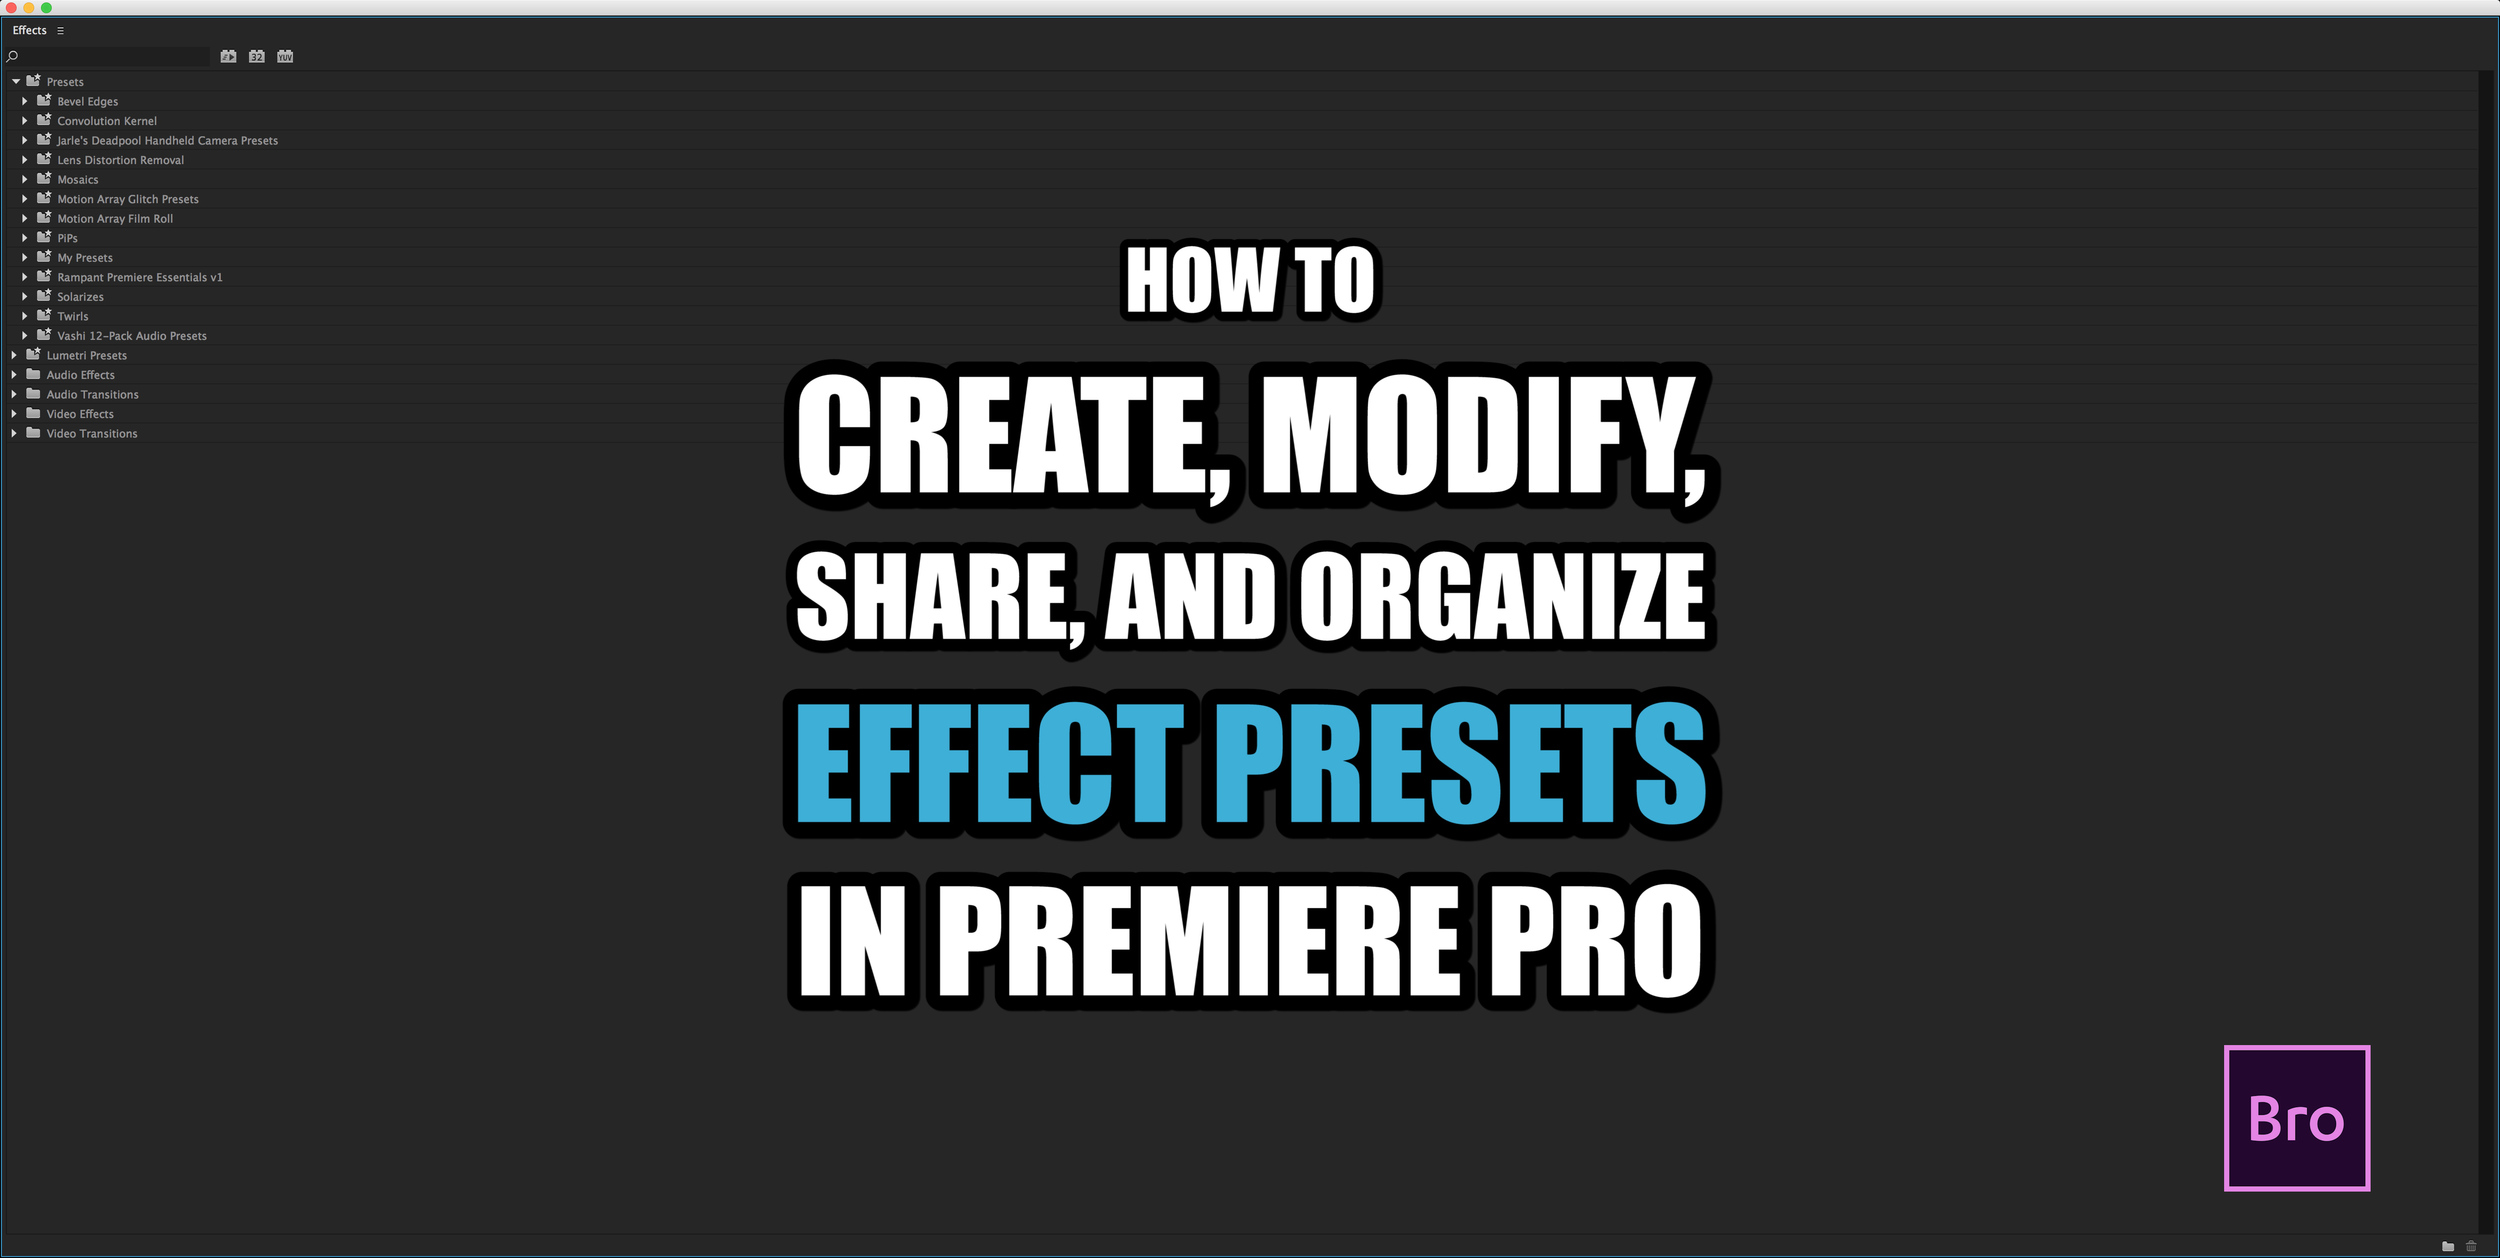
Effect presets are saved effects with customized parameter adjustments. They are project independent, meaning they live in Premiere Pro and are accessible within any project. Effect presets can be used as transitions when applied to the start or end of a clip. All effect presets can be found in alphabetical order in the Presets bin in the Effects panel.
Premiere Pro comes with a number of pre-built effect presets, including:
- Bevel Edges - adds Bevel to edges of the frame
- Convolution Kernel - Blur and Sharpen effects
- Lens Distortion Removal - removes lens distortion from specific camera formats
- Mosaics - transition in/out with Mosaic effect
- PiPs (picture in picture) - Scale and Motion effects
- Solarizes - transition in/out with Solarize effect
- Twirls - transition in/out with Twirl effect
The cool thing about effect presets is any Premiere Pro user can make them! It's very simple; just customize an effect, save a preset, and then share it. (Or sell it! I guarantee you will feel a little entrepreneurial about effects after you read this post.) For me, it's the closest thing to feeling like a Premiere Pro developer.
Create Effect Presets
First, select the effect in the Effect Controls panel, right click and choose Save Preset. Alternatively, you can find Save Preset under the Effect Controls panel pop up menu. (Pop up menus, sometimes called fly-out menus, are the three horizontally stacked lines in the tab of every panel.) To select multiple effects, hold down the Command/Control key while clicking.
Next, name your preset in the Save Preset window. Remember to give it a descriptive name so it will be easily recognizable later.
When you save an effect preset, any and all keyframes are saved too! Think of the clip with the original keyframes as the "source" clip. When an effect preset is applied to other "target" clips, keyframes are added relative to the source keyframes depending on the preset Type: Scale, Anchor to In Point, or Anchor to Out Point. These determine where the source effect keyframes will be positioned on target clips.
Scale - Adjusts the distance between the original keyframes in proportion to target clip duration. For example, if the source keyframes were 20 frames apart and the source clip was 2 seconds long, when the effect preset is applied to a 4 second target clip, the keyframes will be approximately 40 frames apart. In other words, the source keyframes are "scaled" to fit the target clip.
Anchor to In Point - Maintains the source keyframe positions relative to the In point of the target clip. For example, if the first keyframe is 10 frames from the In point of the source clip, this preset type will add the first keyframe 10 frames from the In point on all target clips. Subsequent keyframes will not be scaled to fit target clip duration.
Anchor to Out Point - Maintains the source keyframe positions relative to the Out point of the target. For example, if the last keyframe is 10 frames from the Out point of the source clip, this preset type will add the first keyframe 10 frames from the Out point on all target clips. Subsequent keyframes will not be scaled to fit target clip duration.
Finally, Premiere Pro provides a description field where you can add notes or instructions on how the preset should be applied. This is particularly helpful when sharing effect presets with other Premiere Pro editors.
To learn more about creating effect presets, visit the official Adobe help page Effect presets in Premiere Pro.
Modify Effect Presets
To change an effect preset Name, Type, or Description, right click the preset and choose "Preset Properties...". This setting is also under the Effects panel pop up menu.
Share Effect Presets
Import Effect Presets
Click the Effects panel pop up menu and select "Import Presets...".
Premiere Pro effect presets have the file extension ".prfpset" — say that out loud! An effect preset file can act like a .zip file; one file can contain multiple presets. Browse to the effect preset file you want to import, click open and the effect preset(s) will automatically appear in the Presets bin. That's it! Drag and drop on your clips!
To learn more about installing Premiere Pro effect presets and to see how it's done, watch this Motion Array tutorial: Installing and Using Premiere Pro Presets.
Export Effect Presets
As mentioned above, effect presets can be exported and shared with other Premiere Pro editors. This includes motion, opacity, and speed adjustments!
Choose the effect preset(s) you want to export, click the Effects panel pop up menu and select "Export Presets...". Name the effect preset file. This file name does not change any of the names of the individual preset(s) it contains.
I recommend putting multiple effect presets in a bin before exporting them. This way they will be imported as a bin instead of individual presets. Remember, imported effect presets will look the same as when they were exported.
Organize Effect Presets
It has already been stated that effect presets are saved in the Presets bin by default. However, there are two types of effects bins you can use organize your presets: New Custom Bin and New Presets Bin.
New Custom Bin - Dragging an effect, including an effect preset, into a custom bin will create an alias of the effect. Deleting custom bins or their effects do not remove the original effect from Premiere Pro.
New Preset Bin - Preset bins live under the main Preset bin. Unlike custom bins, they house the actual effect presets. Deleting the bin will remove all of its effect presets from Premiere Pro.
More Effect Presets
Motion Array
It's nice to have the work done for you, ESPECIALLY when it's done for free! Meet Motion Array, a stock template and music site that can't stop giving away Premiere Pro effect presets. Be sure to check out their recently announced Premiere Pro templates as well!
Free Premiere Pro Film Roll Presets
5 Free Premiere Pro Glitch Presets
Jarle Leirpoll
Jarle Leirpoll is a Premiere Pro wizard from Norway and the man behind premierepro.net. Jarle was invited to create camera shake presets for the film Deadpool. Lucky for Premiere Pro users, Jarle made these available for free! Watch the video below to see them in action.
Jarle also has an incredible library of Premiere Pro effect presets available for free. It's kind of a given that every Premiere Pro user should have them installed.
Jarle’s Premiere Pro Presets version 3.0
Vashi Visuals
Editor and post-production consultant Vashi Nedomansky provides the only audio effect presets on this list. These presets are perfect for a quick audio fix. I have used these presets countless times when I needed a telephone effect in hurry. Click the link below and scroll to the bottom of the post for the free download link.
Rampant Design
Rampant Design is a style effects manufacturer that epitomizes coolness. Rampant Premiere Essentials is the only paid Premiere Pro effect presets on this list. The phrase you get what you pay for definitely applies here. For $29 you get 120 professional-grade transitions, visual effects, letterboxes, frame FX, and bump & shake FX. Check out the Premiere Bro "StockEdit" (stock footage edited) featuring effect presets from Rampant Premiere Essentials.

How do you use effect presets in your editing workflow? Do you make effect presets? Got any you're willing to share with other Premiere Pro users? Please share them in the comments below!

