
Premiere Pro 12.0.1 Update: Variable Frame Rate and New Features
Support for Variable Frame Rate, Improvements to Shared Projects, and Other Gems in the 12.0.1 Update for Premiere Pro CC.
The 12.0.1 update for Premiere Pro CC 2018 adds support for Variable Frame Rate. But that's not all! In this post we break down all of the new features tucked away in this sweet little Premiere Pro update.
Media Cache Deletion Message
Just some context for this new feature: Premiere Pro CC 2017 (11.1) introduced new media cache management preferences that could automatically remove old or unused media cache files.
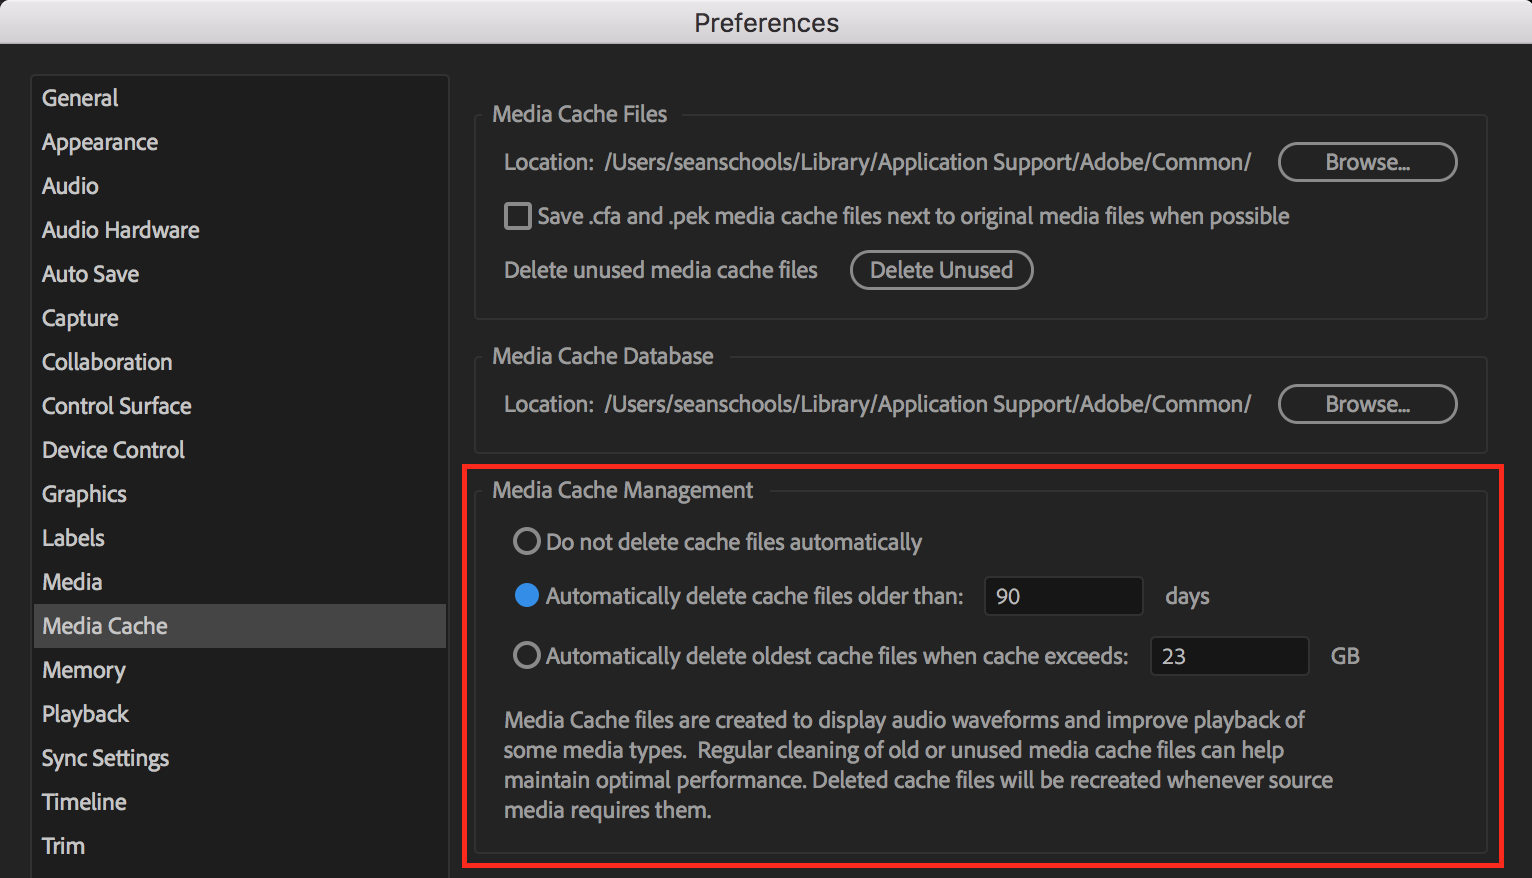
These preferences are intended to help users save storage space and was enabled by default. There were reports that this feature was the culprit for deleting user source media. It was discovered that media files were at risk of being deleted if the media cache folder was not set to the default location. Adobe released a fix in version 11.1.1, which restricted the auto management to the media cache folder structure, and later released version 11.1.2 which further restricted it to specific file types (.pek, .ims, .cfa, etc.). The 11.1.2 update also turned the media cache management preference off by default.
In the 12.0.1 release, Premiere Pro now warns users with a dialogue box that media cache files will be deleted when the preference is enabled.

Variable Frame Rate (VFR) Support
For the longest time, Variable Frame Rate was not supported in Premiere Pro. Variable Frame Rate (VFR) simply means the frame rate varies throughout the video. In the past, if VFR footage had audio, it would slip out of sync with the video inside Premiere Pro. To fix this required manually keeping the audio in sync or converting to Constant Frame Rate using applications like Handbrake.
Premiere Pro CC 2018 12.0.1. can now detect Variable Frame Rate footage. This is indicated in a clip's Properties, which can be found under File > Get Properties for > Selection. Alternatively, you can right-click the clip in the Project panel and select Properties.

Premiere Pro CC 2018 12.0.1 also adds Preserve Audio Sync for Variable Frame Rate footage. This will automatically keep audio in sync without having to make any manual adjustments. Preserve Audio Sync can be found under the Master Clip Effects tab in the Effect Controls panel.

Preserve Audio Sync works by adding or dropping frames, which can result in choppier-looking video. Preserve Audio Sync is the default for all VFR clips that have audio.
If you're working with VFR footage and audio sync is not important, you can select Smooth Video Motion instead. This option ignores the audio and keeps all the available frames. Smooth Video Motion is the default when Premiere Pro does not detect audio in VFR clips.
Adobe lists two "limitations" when working with Variable Frame Rate footage:
- If you plan to use proxy, consolidate, or transcode workflows, it is better to transcode VFR material to a constant frame rate before editing.
- If you have manually synced VFR footage in previous versions of Premiere Pro, you need to resync that footage when opening the project in Premiere Pro 12.0.1 or later versions.
Toggle Multi-Camera Fullscreen in Source Monitor
This multi-cam feature existed in the Program Monitor and is now found in the Source Monitor in Premiere Pro CC 2018 12.0.1. Users can toggle the selected camera fullscreen when viewing multi-cam clips in the Source Monitor.

Support for More Formats
Premiere Pro CC 2018 12.0.1. adds support for importing the following two formats:
- ARRIRAW codec in an MXF container.
- HEVC (H.265) codec in a MOV container.
12.0.1 also improves playback for DPX sequences.
Vertical Clip Alignment Across Tracks
In Premiere Pro CC 2018 12.0.1, holding the SHIFT key when dragging a clip in the Timeline will lock the clip to up and down movements only. This will prevent unintentional horizontal clip movement when moving clips from one track to another. This feature is great for editors who like to get handsy with the mouse, dragging clips vertically in the Timeline.

Improved Options to Solo Audio Track in Source Monitor
Listen, there are plenty of times when Premiere Bro has a hard time explaining new Premiere Pro features. This is one of those times. This is Adobe's description of this feature:
You no longer have to spend time re-setting the solo selection for every clip that is loaded in the Source Monitor. If you have set any of your audio channels to solo, then Premiere Pro remembers that setting even when you load another clip in the Source Monitor (only if both clips have the same number of audio channels).
Import Existing Projects as Shared Projects
Shared Projects is a collaborative workflow tool for editors working on shared storage. The 12.0.1. release of Premiere Pro expands Shared Projects functionality by giving editors the option to import existing projects as Shared Projects. This automatically creates a Shared Projects alias linked to the imported project. To learn more about Shared Project aliases, watch this Done with Dylan tutorial by Dylan Osborn:

Multiple projects can be imported as Shared Projects by selecting the new "Do the same for all projects" check box.
Adobe Immersive Environment Improvements for Mac
In the 12.0.1 release of Premiere Pro, Macs that support VR and HTC Vive can preview and edit VR360 footage. Premiere Pro CC 2018 introduced the Adobe Immersive Environment, where editors can view and edit VR360 footage using a head mounted display and hand controls. While the initial release was primarily for Windows, 12.0.1 brings Macs up to speed, with some caveats:
- If you start Premiere Pro before SteamVR is running, Premiere Pro hangs.
- If you remove the HMD and let it go to sleep state, Premiere Pro takes a long time or may be unable to wake up the HMD. Use the hand controllers often to restore the HMD video preview.
- A low-level exception occurs if you attempt to preview an audio only clip when the Adobe Immersive Environment is enabled.
Match Frame Sets In Point Preference
Match Frame (F) loads the master clip at the current timeline indicator (playhead) in the Source Monitor. It's extremely useful for seeing if there's more usable footage beyond what's shown in the Timeline.

Premiere Pro preserves clip in/out points in the Source Monitor when match framing clips from the Timeline. The 12.0.1 version of Premiere Pro has a new Timeline Preference called "Match frame sets in point". When enabled, Match Frame will open the master clip in the Source Monitor and add an in point at the current time indicator (playhead) instead of showing the clip in and out points.
Whether or not you find this feature useful depends on your project and workflow.
Make Subsequence from In to Out
"Make Subsequence from In to Out" is a new mappable keyboard shortcut added to Premiere Pro CC 2018 12.0.1. It's important to note that this command ignores track targeting. All tracks will be included in the subsequence. Additionally, the new subsequence will automatically open in the Source Monitor.

We think some of the new features in Premiere Pro CC 2018 12.0.1 are absolute gems. But we would like to hear your thoughts! Are you overjoyed to finally have support for VFR? Are you happy with how it's integrated as a Master Clip Effect? How might you use the new "Match Frame Sets in Point" preference? Will you set a custom keyboard shortcut for the new "Make Subsequence from In to Out" command? Let us know below!

