
Edit to the Beat with BeatEdit for Premiere Pro

How to Use BeatEdit to Edit to a Beat or Edit Music in Premiere Pro.
[Sponsored Post]
BeatEdit is a Premiere Pro extension that auto detects beats in a music track, and generates clip or sequence markers in Premiere Pro. The markers can then be used as a guide for manually trimming clips to the beat or for automatically assembling a complete edit using Premiere Pro’s Automate to Sequence feature.
BeatEdit was developed by Mathias Möhl, founder of mamoworld. Like many Premiere Pro users, Mathias used to manually add beat markers before editing to a music track.
MATHIAS: I edit in Premiere Pro myself, and, whenever I used music, my first step was creating beat markers manually. This felt so boring and tedious that I wanted to automate this task.
For those who aren’t familiar with this workflow, markers are manually added to a clip or sequence by tapping the M key on the beats during playback. Very often this method required a great deal of trial-and-error, and having to go back to finesse marker positions. The following video humorously demonstrates how archaic this workflow has become since the invention of BeatEdit.

Purchasing and Installing BeatEdit
BeatEdit is available for purchase at aescripts.
In order to install BeatEdit, you will also need to download the free aescripts ZXP installer. The zxp installation instructions are included in the BeatEdit download.

To launch BeatEdit, go to Window > Extensions > BeatEdit. It will open as a floating panel, which you can dock anywhere you like.

Overview of the BeatEdit Interface
The BeatEdit interface is straightforward. At the top, you have the marker controls where you can choose between Clip Markers or Sequence Markers, as well as create or delete markers.

Below that is the BeatEdit player, which displays the audio waveform, beat markers, and region view. Below the player are two volume sliders. BeatEdit generates clicks on the beat during playback. Use the sliders to raise or lower the music and click volume independently of each other.

At the bottom is all the beat detection parameters, which we will cover in detail later.
Playback in BeatEdit
It’s important to realize playback in BeatEdit does not behave the same as the Source and Program Monitors in Premiere Pro. For example:
Spacebar will not begin playback. You must click the Play button.
Dragging over the waveform does not scrub the audio. It makes a region selection, highlighted in blue. Also, everything to the left of the playhead is light gray and everything to the right is dark gray. This might appear like a selection, but it is not.
Click the waveform to move the playhead to specific point. Use the left arrow button to return to the beginning of the song.
Drag the lower region selection preview to move the waveform view. There are no controls to zoom in or out of the waveform view.
Opening and Analyzing Audio Files in BeatEdit
The Load Music button is where the BeatEdit workflow begins. If you’re like me, the first thing you will do is drag a music track from your Project on to the BeatEdit panel. Unfortunately, that’s not how it works. This is a limitation of Premiere Pro’s extension API and not the desired design for BeatEdit.
Click the Load Music button to open an audio file from your hard drive. BeatEdit will automatically analyze the audio file and generate beat markers, visualized by blue lines on the audio waveform. The analysis only takes a few seconds.
That accuracy of BeatEdit is amazing! And no, it’s not just reading the audio waveform peaks. It’s much more sophisticated than that.
MATHIAS: I decided to license a high end beat tracker for BeatEdit that is developed by the universities in Porto (Portugal) and Victoria (Canada). This beat tracker goes way beyond simple peak detection and combines several methods and lots of expert knowledge to get accurate results, even for songs where the beat is not obvious.
You may notice that markers generated by BeatEdit don’t always line up with the audio waveform peaks in the Premiere Pro. Rest assured, the markers are accurate.
MATHIAS: The results of BeatEdit are absolutely reliable and robust. Users wonder why sometimes beats are a tiny bit before or after a peak in the waveform. This is no mistake or inaccuracy; musicians sometimes play notes, often unconsciously, slightly before or after a beat to create a specific swing or groove. BeatEdit is so accurate that you can actually see that.
If you want to know more about the accuracy of BeatEdit, watch the following video:

Summary In this tutorial we cover an interesting little fact that also experienced video editors are often not aware of: The beats of a song are not always located exactly at peaks visible in the waveform. Sometimes they are located slightly before or after them.
Using BeatEdit
It’s time to dig into the power of BeatEdit and customize the beat markers. Non-musical users need not be afraid! BeatEdit does not require a musical background to use. All you need is an understanding of BeatEdit’s controls.

The first drop down menu toggles between the whole track or a specific selection.

The second menu determines whether beats are added or removed to a selection.

The next operator specifies how many beat markers are added or removed per number of beats.

Finally, beats can be distributed evenly or randomly.

When set to randomly, another field will appear that determines the range BeatEdit will randomly add or remove a beat marker.

Here’s the most helpful tip in this post for using BeatEdit: read the controls from left to right as if you were reading a sentence.
For example:

The settings above read, “In entire song, add to selection one beat every four beats evenly.”
Press Select to run BeatEdit’s beat marker selection based on your parameters.
Another thing you need to know is BeatEdit generates beat markers based on the beat nearest the playhead. In other words, BeatEdit will select the beat nearest the playhead and let the other beat markers fall accordingly. If you need to shift all your beat markers forward or backward a beat or two, move the playhead and press Select again. For example, if you want the markers to land on the downbeats, move the playhead to a downbeat and click Select.
With this information you can begin using BeatEdit to generate simple markers to edit videos to a beat. This is perfect for vlog montages, Instagram stories, home videos, etc.
MATHIAS: There are projects that need to be done as fast as possible. Wedding filmmakers, for example, love BeatEdit’s ability to create automatic edits in no time, so even on the day of the event they can show the bridal couple a completed video.
Adding or Removing Markers From Selected Regions
Obviously, there’s a lot more to BeatEdit, and in this section we’ll look at ways to make more organic beat selections.
The simplest way to introduce some complexity into your beat markers is by selecting specific areas and changing the beat detection controls. For example, let’s say you’ve evenly added 1 beat every 8 beats for the entire song. You can select just the chorus by dragging over the waveform and changing the controls to “In highlighted region, add to selection 1 beat every 4 beats, evenly.” This will create more beat markers during the chorus of the song. Conversely, you could remove beat markers from a particular area of the song using the same selection controls.

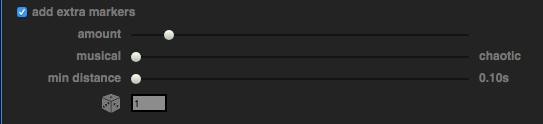
Add Extra Markers
Even after adding or removing markers from specific regions, you may find that your beat markers still feel robotic. Check the “add extra markers” box to access the more advanced controls of BeatEdit. Don’t be scared of the “random” or chaotic” terms. Instead, think of them as ways to make your edit feel more human and organic.
Besides detecting beats, BeatEdit can also identify what it calls “onsets” or rhythmically relevant parts of the music. The “add extra markers” section uses these onsets.
MATHIAS: One of the many steps that BeatEdit does to detect the beats is to detect peaks in the waveform that are events of rhythmic interest. It rates and filters these peaks based on various criteria to decide how "important" they are in the music. The result is a list of "onsets" each with a weight indicating how "important" it is.
Use the Amount slider to increase the number of beat markers added to onsets in the song. Beat markers added to onsets in BeatEdit are visualized by yellow lines on the audio waveform.

When you add extra markers, they can be added musically or randomly. This is controlled by the “Musical <-> Chaotic slider. Notice in the GIF above that the yellow beat markers are added to the louder parts in the waveform before the quieter parts. This is because it is set to 100% musical.
MATHIAS: If you set the "musical<->chaotic" slider to 100% musical, it will pick the onsets strictly sorted by weight, i.e. it will choose the most "rhythmically relevant" ones first. If you choose more "chaotic" it picks the onsets more randomly i.e. might pick less "rhythmically relevant" ones before picking more "rhythmically relevant" ones. That's why for 100% musical the randomness has no influence.
You can also control the distance between these extra markers with the Min Distance slider. This will expand the separation between the extra markers you’ve added, whether musically or randomly.

This brings us to the dice icon. Clicking the dice generates a random selection of beat markers dependent on your extra markers parameters. However, the dice can not be used when BeatEdit is set to 100% musical. Notice below the Musical<-> Chaotic slider is set to 100% chaotic.

The cool thing about the dice is it remembers previous beat marker configurations. That’s the reason for the number: each number is a previous state. The dice recalls previously randomly generated onsets. Enter a number to go back to a previous selection. In tech speak, the number is the “seed” for the random number generator used by BeatEdit.
Watch the second half the tutorial below to see the "Add Extra Markers" controls in action.

When you generate an automatic cut with Beat Edit for Premiere Pro, you most likely don't want to have a cut at each beat. BeatEdit comes with a bunch of easy and intuitive tools to influence where the cuts should be located.
Create Markers
After you’re happy with your beat markers, it’s time to create markers in Premiere Pro! The difference between clip markers and sequence markers is simple: clip markers go on the music track and sequence markers go on the sequence.
Clip Markers
BeatEdit will add markers directly to the audio file and import the file unless it detects the file is already imported in the Project panel. Clip markers are great for manual editing. Enable snapping (keyboard shortcut: S) in the Timeline so edit points snap to the marker positions. You can edit to the beat by moving and trimming video clips to markers on your music clip.

Sequence Markers
Sequence markers are added to a sequence. More importantly, they can be used with Premiere Pro’s Automate to Sequence feature. We’ll look at that in the next section.
To create sequence markers, the audio file must be in the active sequence in order for BeatEdit to know where in the sequence the markers should go. You can have multiple instances of the same audio file in the sequence; BeatEdit will add sequence markers to each instance.
Take a moment to review your markers before you start editing. If you’re not satisfied, it’s easy to remove the markers in BeatEdit by selecting Delete All. You can tweak BeatEdit’s controls and try again.
Alternatively, it may be easier to manually add, remove, or adjust your markers. Sequence markers can be edited in the Timeline and clip markers can be edited in the Source monitor. For example, you may find that you need to add a marker on the very first frame. Move the playhead to the beginning and press the M key to manually create a marker.
This is also a good time to mention that you can quickly jump back and forth between markers using the keyboard shortcuts: SHIFT+M and CMD/CTRL+SHIFT+M.
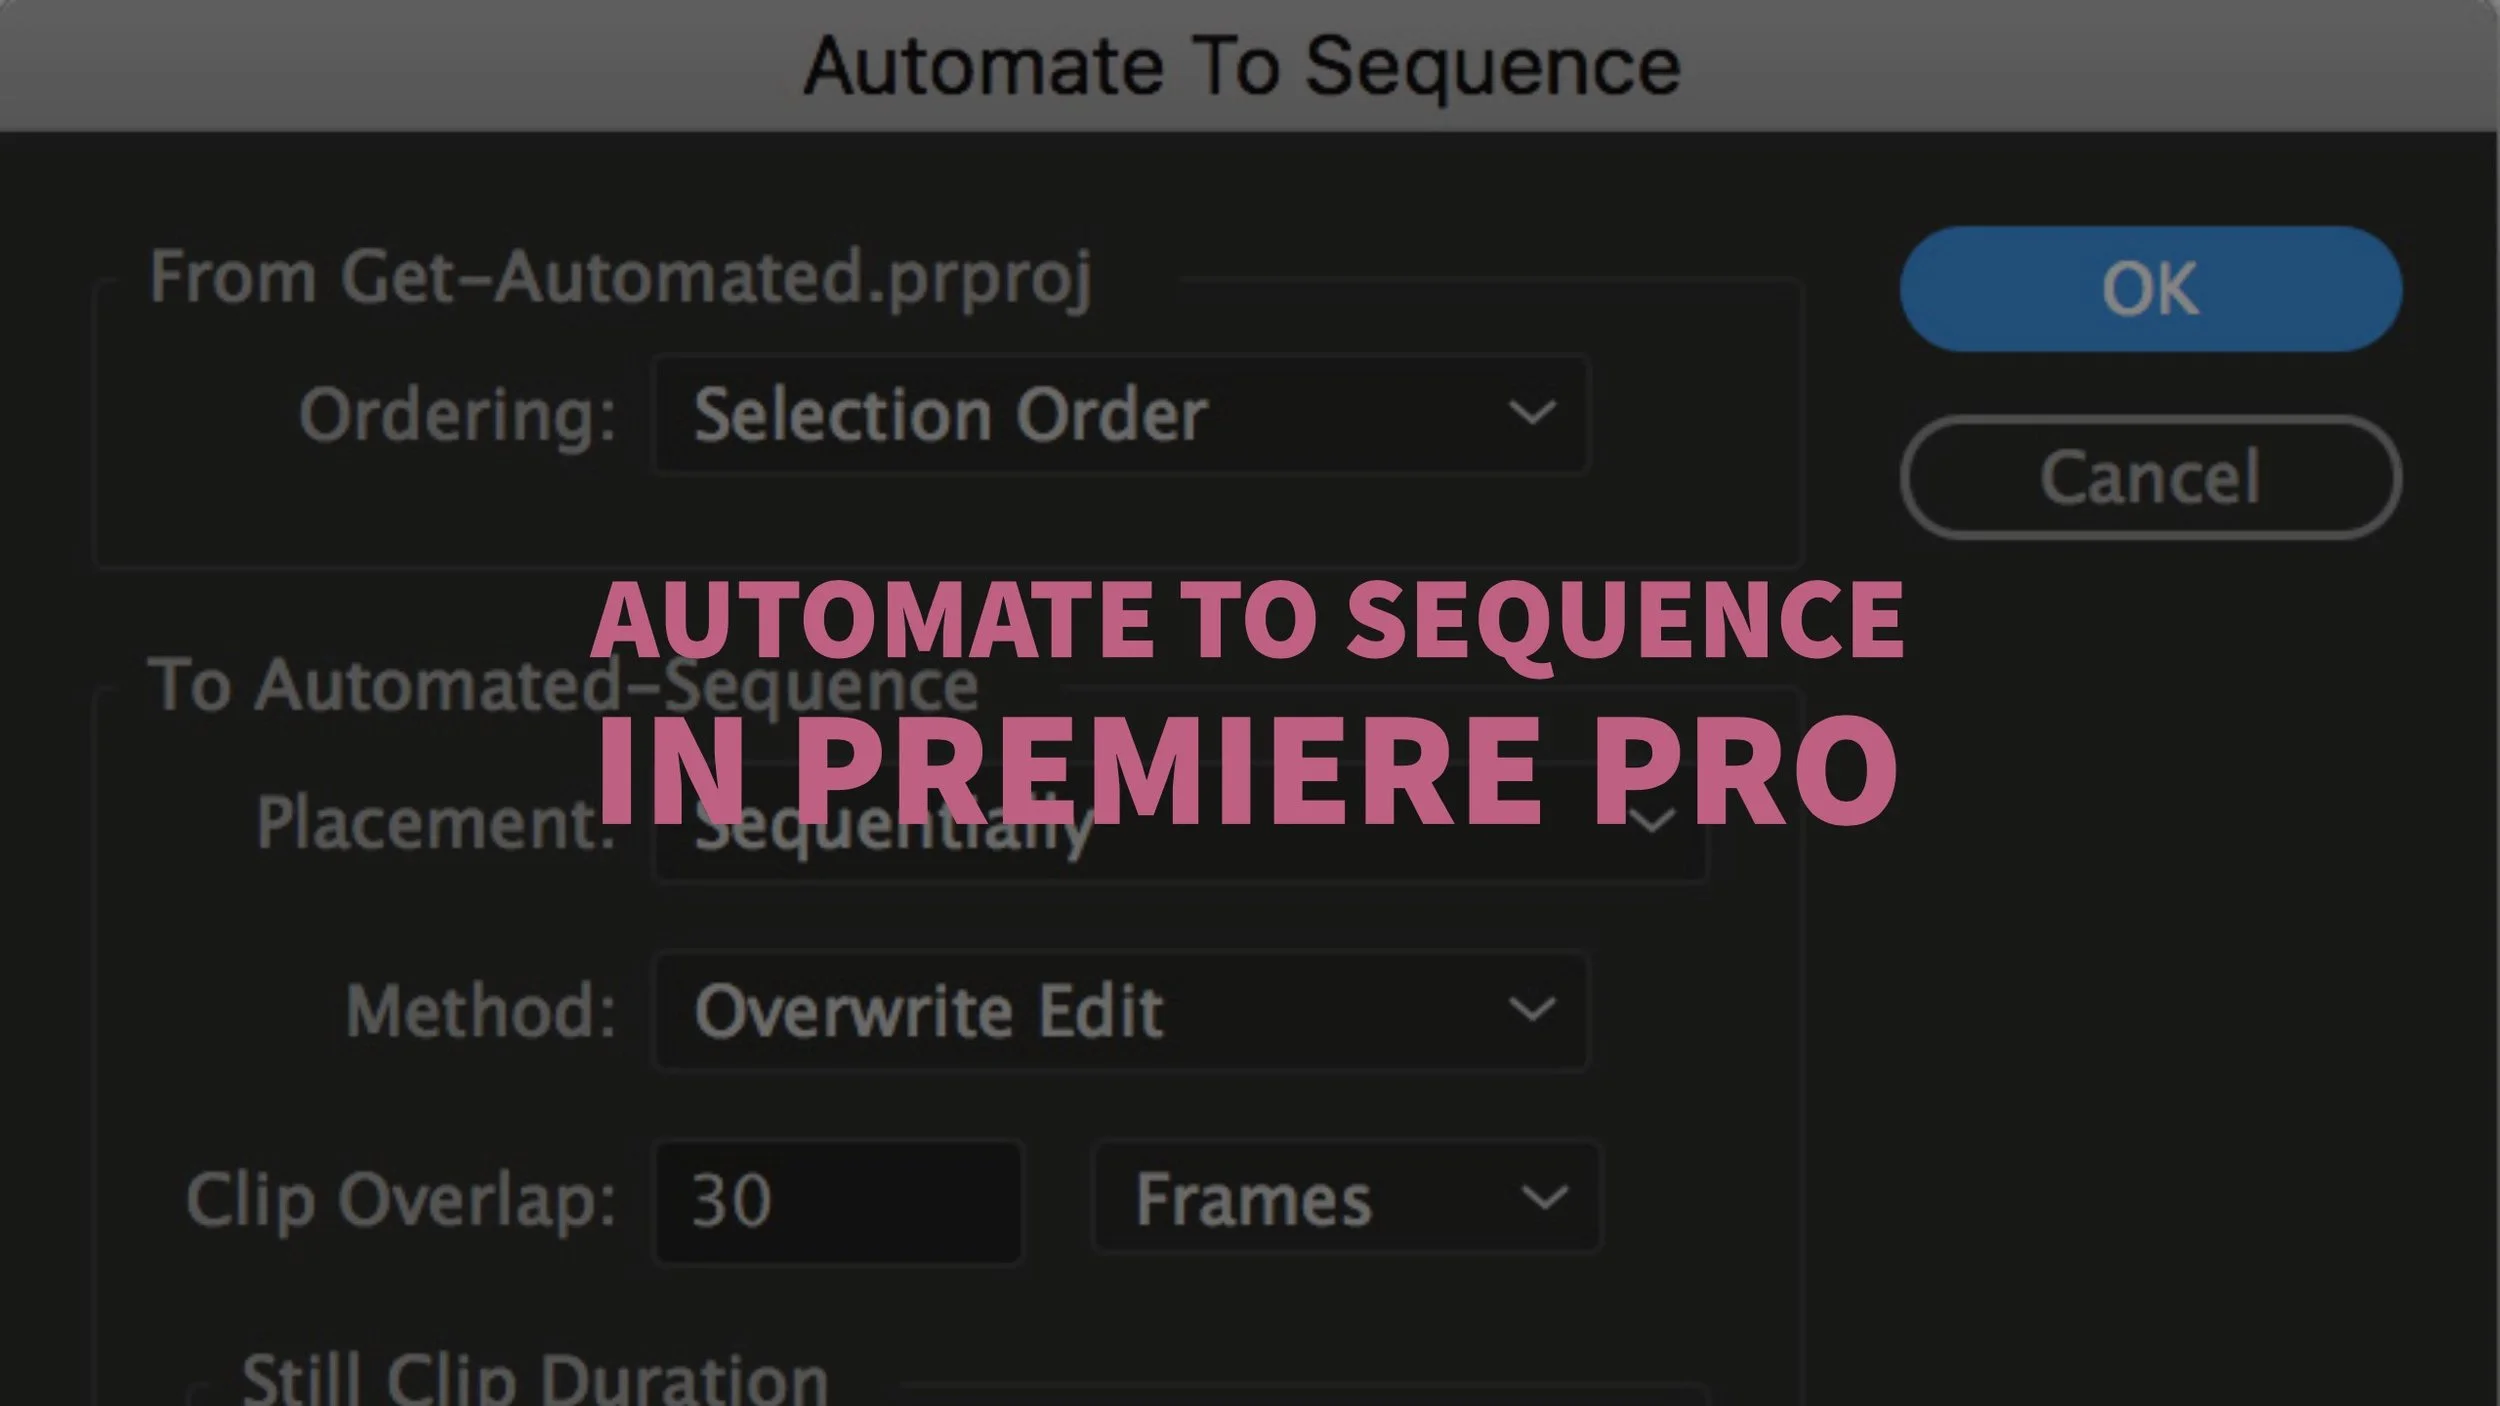
Automate to Sequence in Premiere Pro
Creating an automatic edit with BeatEdit markers requires using Automate to Sequence in Premiere Pro. It’s a fantastic feature, and if you’re not yet using it, you will be soon — hopefully with BeatEdit! For an in-depth look at Automate to Sequence, read our blog post: Automate to Sequence in Premiere Pro. Briefly put, Automate to Sequence will automatically add a selection of clips to a sequence using sequence markers.
Toggle Thumbnail view at the bottom of the Project panel and arrange your clips in the order you would like them in the Timeline. Set In points on your clips so they start a specific point. You can add in points in thumbnail view directly in the Project panel or you can load all your clips in the Source monitor and add in points the more familiar way. To learn more about this method, read our blog post: Open Multiple Clips and Sequences in the Source Monitor in Premiere Pro.
To see the process of creating automatic edits with BeatEdit and Automate to Sequence in Premiere Pro, watch the tutorial below.

In this tutorial you learn how to create an automatic cut in sync with the music using BeatEdit for Premiere Pro. BeatEdit automatically detects the beats in your music and arranges your clips in the Premiere Pro timeline accordingly.
Manual Editing with Markers
Even if you have created an edit with Automate to Sequence, you might find that you still want to make some manual edits. The first thing you want to do is enable Snapping in the Timeline settings. Use the keyboard shortcut S, or click the magnet icon in the Timeline. This will snap edit points to the markers when moving or trimming clips.

When manually editing to sequence markers, you may want to disable the Ripple Sequence Markers setting. You can find this under the Markers menu.

As the name infers, when you perform any kind of ripple edit or ripple delete, the sequence markers will ripple as well. Under normal editing circumstances this is probably what you would want to happen. But when using sequence markers to edit to a beat, you want your sequence markers to stay where they are, fixed to the beat of the music track.
The tutorial below walks through the techniques of manually editing using markers created with BeatEdit in Premiere Pro.

In this tutorial you learn how BeatEdit for Premiere Pro can support you in manual editing tasks. BeatEdit automatically detects the beats in your music and represents them as markers in your Premiere Pro timeline. This makes it very easy to place your cuts exactly at the beats such that the cut feels smooth and fits nicely to the music.
Slip Tool
The Slip Tool (keyboard shortcut: Y) is great for adjusting the content of a clip without changing its duration in the Timeline. For example, let’s say you’re happy with the timing of your edits, but you want to use a different section of your clip. With the Slip Tool selected, click and drag on a clip to shift the starting point forwards or backwards without changing the clips in and out points in the Timeline.

Rolling Edit Tool
The Rolling Edit tool (keyboard shortcut: N) affects both sides of the edit point: the out point of the current clip and the in point of the proceeding clip. Use this tool to shift the edit point in the forwards or backwards in the Timeline. For example, let’s say you want to extend a clip one whole beat. With the Rolling Edit tool selected, click and drag the edit point of the clip till it snaps to the next beat marker

Ripple Edit Tool
The Ripple Edit tool (keyboard shortcut: B) is a handy tool for trimming the durations of clips and shifting the rest of the entire Timeline. The Ripple Edit tool is visualized with a yellow arrow cursor and yellow bracket on the edit point.

Nine-times-out-of-ten you will want to use the Ripple Edit tool on the tail end of clip (shown above) when manually editing to beat markers. If you use the Ripple Edit tool on the beginning of a clip (shown below), you’re actually only changing the duration of the clip, the in point stays the same and the out point of the clip moves forward in the Timeline. Notice how the edit point remains in the same place in the GIF below.

Editing Music to the Edit
BeatEdit can also be used to edit the music to fit the edit. With clip markers applied to the downbeats of a song, it is easy for editors to loop or shorten the music track to the duration of the edit.
MATHIAS: Editors appreciate that they use BeatEdit to edit music accurately. They can duplicate or remove parts of a music track to get a desired length. This is similar to Audition’s Remix feature. But, while Remix is a one-click automatic solution, BeatEdit gives you control over the edit of the entire song. Usually editors are not only interested in the total length of the clip, but also where the music transitions from one point to another.
Watch the following video to see Mathias use BeatEdit markers to accurately edit the timing of a song.

In this tutorial you learn how you can edit music in Premiere Pro very easily to fit to your video.
Summary
The beauty of BeatEdit is its simplicity. Essentially it does one thing: adds markers on the beats. But this makes it adaptable to virtually any editing workflow involving music tracks. BeatEdit is an essential tool for editing to music in Premiere Pro. As a Premiere Pro user, it’s reassuring to know that a third party plugin was developed specifically for your NLE.
MATHIAS: I personally use Premiere Pro for editing and wanted to have such a tool for my own workflow. Hence, Premiere Pro was the perfect fit. And currently we are actually working on a version for After Effects, too.
In all my testing, there was only one song where the intro fooled BeatEdit for a couple measures before it picked up on the correct timing. I tried importing the file to run the beat detection analysis again, but I got consistent results. The fix was manually moving a couple markers at the beginning of the song. Hardly an inconvenience.
BeatEdit will amaze even the most skeptical ears. It’s beat detection is stunningly accurate. And to be able to snap edit points to the beat with markers in Premiere Pro is dream-like editing workflow.
Obviously, we have a lot of positive things to say about BeatEdit. But what about you? What's your first impression of BeatEdit? We would especially love to hear from other Premiere Pro users who have used BeatEdit. How do you use it in your workflow? Let's talk in the comments below!

